
Source code in this repository.
So, imagine this. I'm sitting in physics class, and Mr Norrie is talking about time dilation and muons or something. And then Bento, my beloved, the only glistening beam of hope in a dark, dark world, asks me how I made some WACE questions (for the light test we had earlier) into a booklet. I told him I used 'pdfbook2', a Python program. But Bento doesn't want to install Python on his computer (can't blame him really).
So, what to do?
Well, I first suggested to go on any one of the many websites which offer this. But Bento, my beloved, said that they were too suspicious, and didn't trust them enough to upload his valuable PDFs (once again, can't blame him really). Then, I googled something along the lines of 'pdf to booklet apps windows' and discovered BookletCreator, which appears to be a pretty good tool for Mac and Windows. Although Bento still doesn't trust the app, he installs it, and discovers that it is a trial version! And, it only formats the first 16 pages!
In fact, Bento points out that most websites have this limitation, either they only do a few pages, or they don't allow relatively big PDFs.
Hence, there does seem to be an issue here. Being able to convert your PDFs into booklets to print is a powerful tool to have, considering that you would use a quarter of the paper compared to printing each page single sided. This is obviously an environmental and financial W.
But unfortunately, despite processing PDFs into printable booklets being a relatively simple thing to do (just need to move around the pages with some math and squish 2 side by side onto a single page), there does not exist a convenient, widely available resource to do so. All the many websites which offer this service end up falling into the trap of limiting people, in some form or another. And it's unfeasible to expect everyone to use Linux just so they can conveniently run the Python program in the terminal.
And thus, I told Bento to 'let me cook'.
So I'm sitting there in physics, and I'm pondering. In theory, it's probably not that hard to manipulate the PDFs into a booklet. But the issue is, I want it to be easily accessible, which means either making an app or a website. I have very little experience making an app, and also I don't want to think about tkinter or PyQt5 again. So, I guess I'm going to do a website. But then this leads to another issue!
I've only ever made static sites. What that means is there's no server behind the website to process user input. I'm unable to simply upload a PDF and expect to process it with JavaScript[1]. Which kinda sucks! So then I gotta figure out how to do the following:
It seems that, quite conveniently, pdfbook2 is, in fact, open-source! So I can literally just look at their code, specifically their booklify function.
  def booklify(name, opts):
    # ------------------------------------------------------ Check if file exists
    print("\nProcessing", name)
    if not os.path.isfile(name):
        print("SKIP: file not found.")
        return
    print("Getting bounds...", end=" ")
    sys.stdout.flush()

    # ---------------------------------------------------------- useful constants
    bboxName = b"%%HiResBoundingBox:"
    tmpFile = ".crop-tmp.pdf"

    # ------------------------------------------------- find min/max bounding box
    if opts.crop:
        p = subprocess.Popen(
            ["pdfcrop", "--verbose", "--resolution", repr(opts.resolution), name, tmpFile],
            stdout=subprocess.PIPE,
            stderr=subprocess.PIPE,
        )
        out, err = p.communicate()
        if len(err) != 0:
            print(err)
            print("\n\nABORT: Problem getting bounds")
            sys.exit(1)
        lines = out.splitlines()
        bboxes = [s[len(bboxName) + 1 :] for s in lines if s.startswith(bboxName)]
        bounds = [[float(x) for x in bbox.split()] for bbox in bboxes]
        minLOdd = min([bound[0] for bound in bounds[::2]])
        maxROdd = max([bound[2] for bound in bounds[::2]])
        if len(bboxes) > 1:
            minLEven = min([bound[0] for bound in bounds[1::2]])
            maxREven = max([bound[2] for bound in bounds[1::2]])
        else:
            minLEven = minLOdd
            maxREven = maxROdd
        minT = min([bound[1] for bound in bounds])
        maxB = max([bound[3] for bound in bounds])

        widthOdd = maxROdd - minLOdd
        widthEven = maxREven - minLEven
        maxWidth = max(widthOdd, widthEven)
        minLOdd -= maxWidth - widthOdd
        maxREven += maxWidth - widthEven

        print("done")
        sys.stdout.flush()

        # --------------------------------------------- crop file to area of interest
        print("cropping...", end=" ")
        sys.stdout.flush()
        p = subprocess.Popen(
            [
                "pdfcrop",
                "--bbox-odd",
                "{L} {T} {R} {B}".format(
                    L=minLOdd - opts.innerMargin / 2,
                    T=minT - opts.topMargin,
                    R=maxROdd + opts.outerMargin,
                    B=maxB + opts.outerMargin,
                ),
                "--bbox-even",
                "{L} {T} {R} {B}".format(
                    L=minLEven - opts.outerMargin,
                    T=minT - opts.topMargin,
                    R=maxREven + opts.innerMargin / 2,
                    B=maxB + opts.outerMargin,
                ),
                "--resolution",
                repr(opts.resolution),
                name,
                tmpFile,
            ],
            stdout=subprocess.PIPE,
            stderr=subprocess.PIPE,
        )
        out, err = p.communicate()
        if len(err) != 0:
            print(err)
            print("\n\nABORT: Problem with cropping")
            sys.exit(1)
        print("done")
        sys.stdout.flush()
    else:
        shutil.copy(name, tmpFile)

    # -------------------------------------------------------- create the booklet
    print("create booklet...", end=" ")
    sys.stdout.flush()
    pdfJamCallList = [
        "pdfjam",
        "--landscape",
        "--suffix",
        "book",
        tmpFile,
    ]

    # add option signature if it is defined else booklet
    if opts.signature != 0:
        pdfJamCallList.append("--signature")
        pdfJamCallList.append(repr(opts.signature))
    else:
        pdfJamCallList.append("--booklet")
        pdfJamCallList.append("true")

    # add option --paper to call
    if opts.paper is not None:
        pdfJamCallList.append("--paper")
        pdfJamCallList.append(opts.paper)

    # add option --short-edge to call
    if opts.shortedge:
        # check if everyshi.sty exists as texlive recommends
        p = subprocess.Popen(
            ["kpsewhich", "everyshi.sty"], stdout=subprocess.PIPE, stderr=subprocess.PIPE
        )
        out, err = p.communicate()
        if len(out) == 0:
            print("\n\nABORT: The everyshi.sty latex package is needed for short-edge.")
            sys.exit(1)
        else:
            pdfJamCallList.append("--preamble")
            pdfJamCallList.append(
                r"\usepackage{everyshi}\makeatletter\EveryShipout{\ifodd\c@page\pdfpageattr{/Rotate 180}\fi}\makeatother"
            )

    # run call to pdfJam to make booklet
    p = subprocess.Popen(pdfJamCallList, stdout=subprocess.PIPE, stderr=subprocess.PIPE)
    out, err = p.communicate()

    # -------------------------------------------- move file and remove temp file
    os.rename(tmpFile[:-4] + "-book.pdf", name[:-4] + "-book.pdf")
    os.remove(tmpFile)
    print("done")
    sys.stdout.flush()
Notice how the function takes in the name of the pdf, and some arguments. I think the default arguments work best, so I'll just use them[2]. It also requires a non-standard program, pdfjam. This is annoying, but since I'm planning on running this on a server, I get the added benefit of being able to run calls to installed programs on the server! It turns out, pdfjam is bundled with TeX Live, so I just need to remember to install it on the server I end up using.
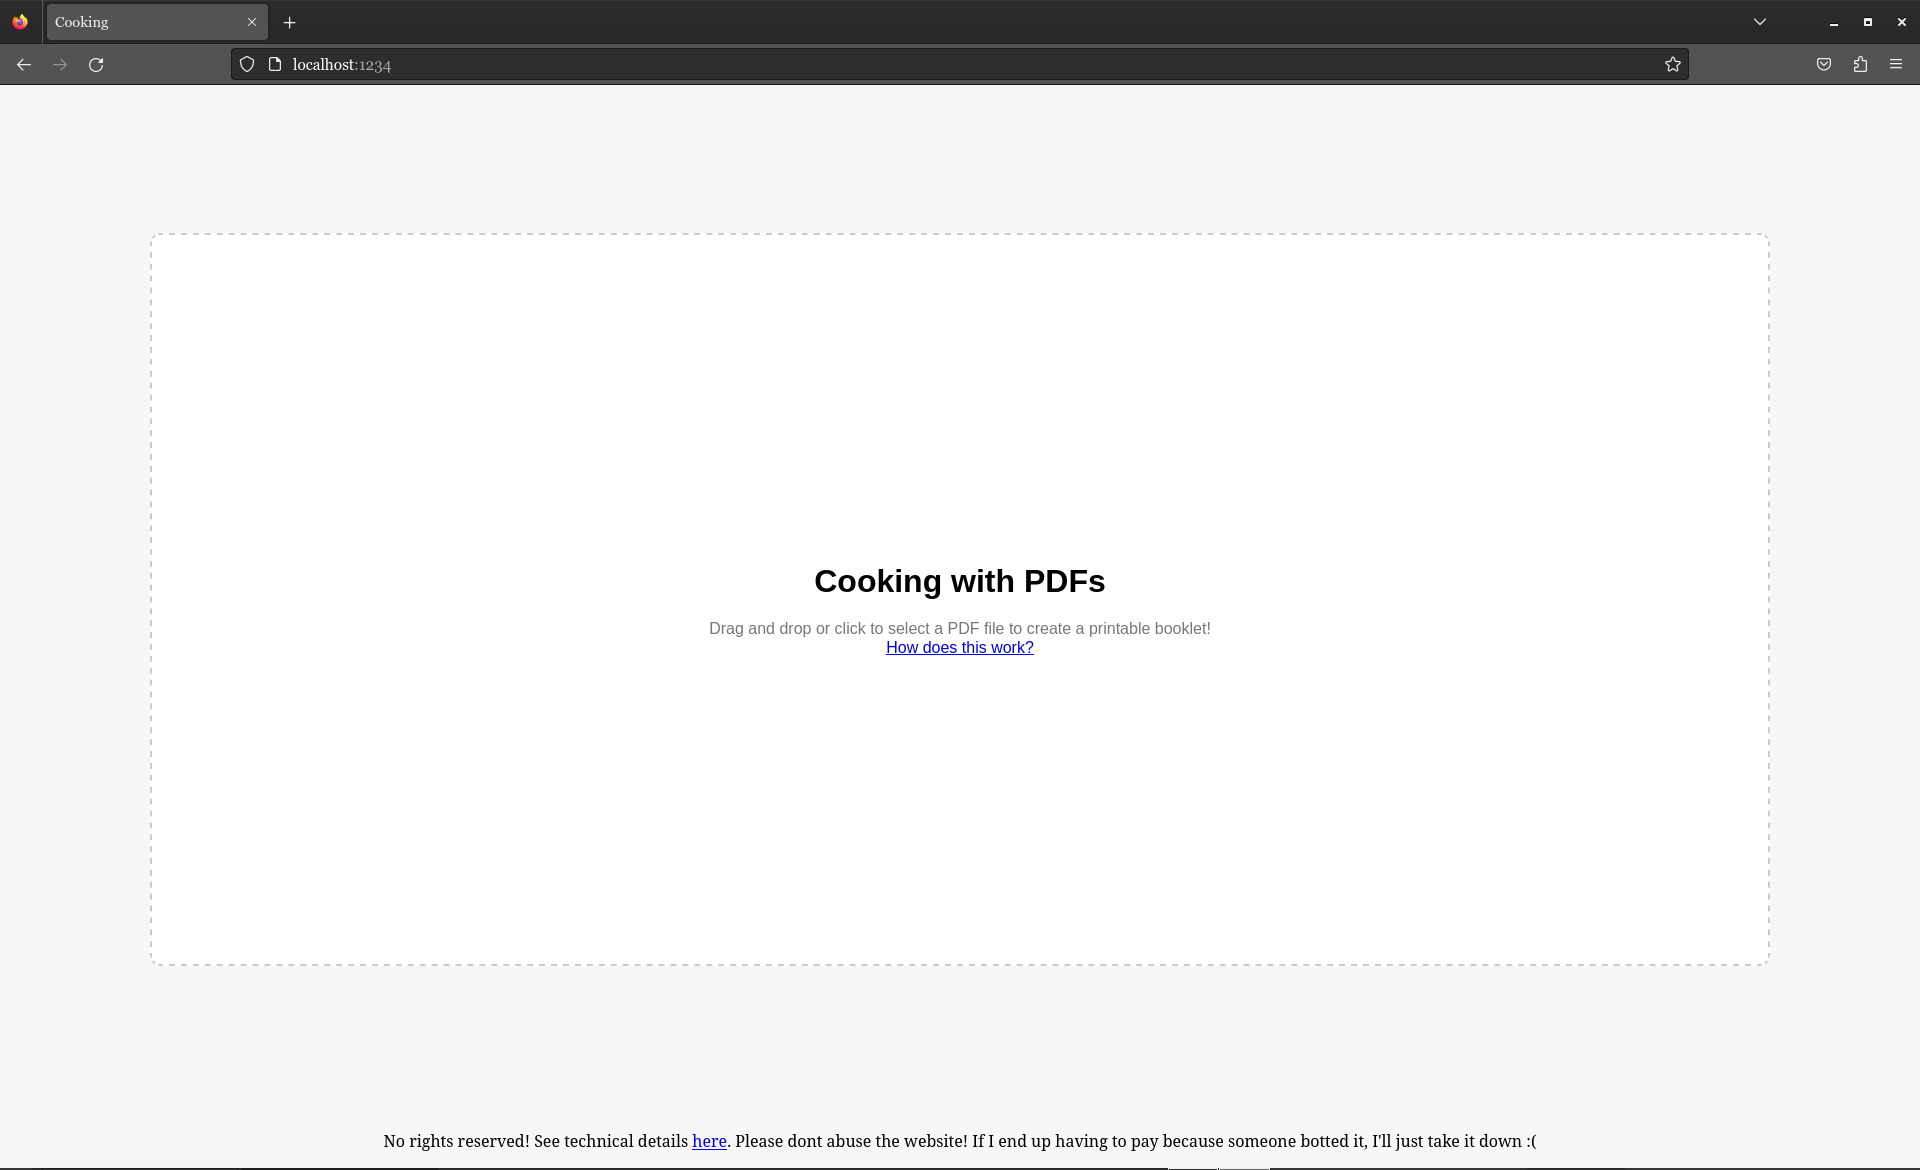
Great! So after playing around with this code and adding a file input method, I have a Python program that can convert a PDF to a printable booklet. I now need to find a way to make this more accessible to use.
So I want to turn my Python program into a website. That only means one thing... Flask 😣 But it's okay! Flask is really cool (not really). Using Flask, I'm able to create a quick demo using the Python program, and run it on my computer as a local server.
Awesome! Just one tiny issue. Do I actually just make my computer a web server? I don't think so. That costs money, and I don't have money...
So I need a way to host this server on the cloud, in a way that doesn't cost money. So this is where the sponsor of this website comes in, Google!

Google is my best friend. I've been piggy-backing off Google in almost everything I've made. Demeter uses Google Docs, my Chinese things use gTTS and googletrans. My pinyin tool uses the Google Translate API and so on. So of course, in my time of need, I turned to Google to help me out here. To help me turn my silly local server into a cool, awesome and (hopefully) free website!
So, how on Earth do I turn a local server into a functional website? Google's Cloud Run, of course? But, how do I turn my current code into something Google can use? Well this is where containers come in. Containers are like VMs but so, so much better. Essentially, they're programs running mini OS's which have all the programs necessary to do a specific thing. In our case, we're trying to run a Flask app. How do we make containers? Images! We need to instruct our container to install certain things, and configure it with its unique OS. We do this using an image!
I used Docker for this, but there are many alternatives around. Docker's just the most widely used.
This is neat and all, but how do we actually build an image, using our current Flask app? We use Dockerfiles! Dockerfiles essentially tell Docker how we want to make our OS, what kind of specific programs and properties we want it to have. This is useful, because as I mentioned previously, running our program on a completely new installation of Debian, for example, would not work. This is because Debian doesn't have TeX Live installed by default, so we need to include this in our Dockerfile. Here it is:
FROM python:3.9-slim

RUN apt-get update && \
    apt-get install -y --no-install-recommends \
    texlive \
    texlive-extra-utils \
    texlive-latex-extra \
    ghostscript \
    && apt-get clean \
    && rm -rf /var/lib/apt/lists/*

WORKDIR /app

COPY requirements.txt .

RUN pip install --no-cache-dir -r requirements.txt

COPY . .

EXPOSE 5100

CMD ["python", "app.py"]
What does this do? Well, if we go from a line-to-line basis:
Simple enough. Now we just gotta make the image. The exact command I ran was docker build -t cookingv1 ., which gave me a docker image to play with!
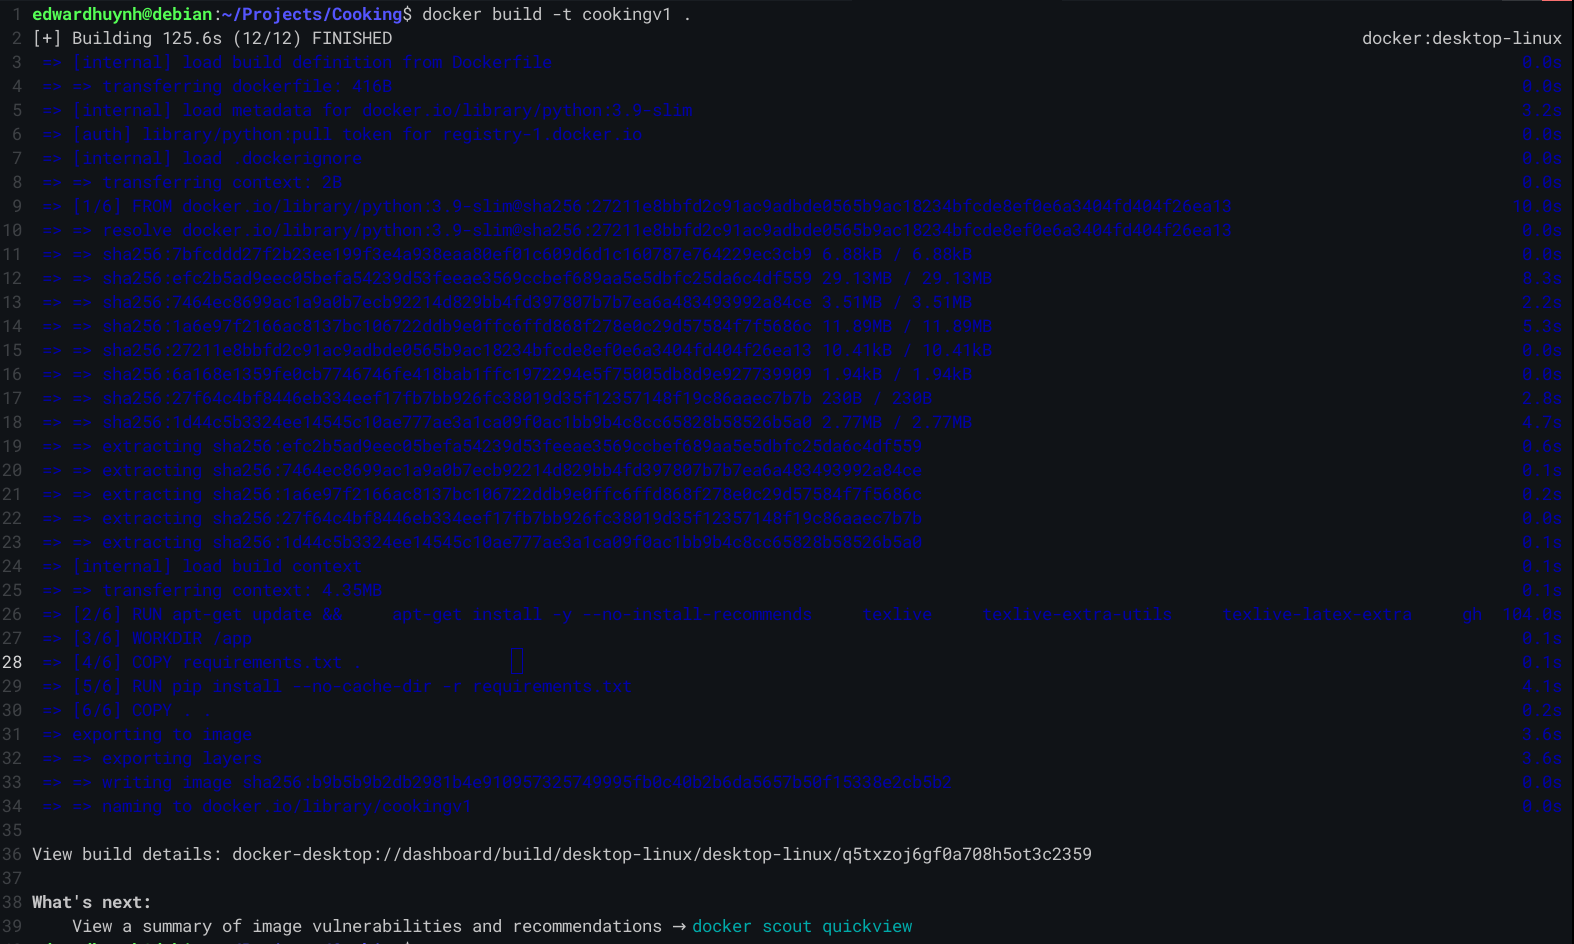
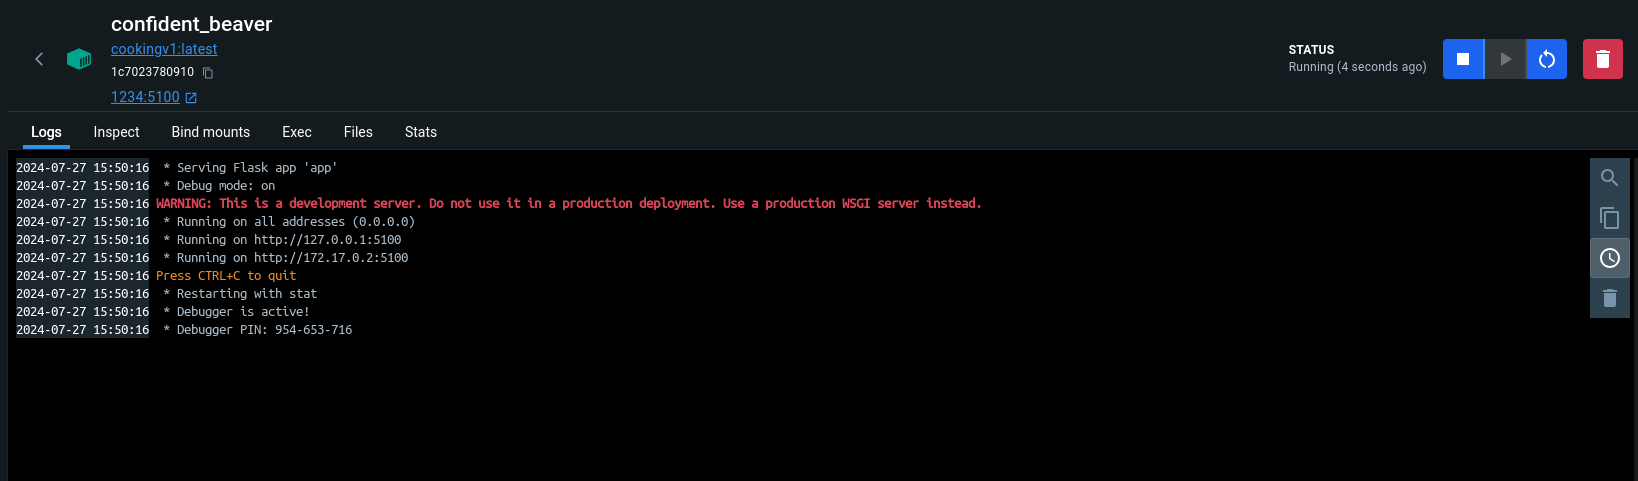
Running this image as a container and exposing a port lets me test out whether it all still works. Thankfully, it does!
Awesome. Time to give it to Google. This is where the pain begins.
You gotta listen very carefully here, because Google is unfortunately quite finicky.
Before we actually create a container in Google's Cloud Run, we need to give Google the image we just made. Here's a guide on how to do that. Read it in full, hopefully it will save you time I lost :( Also, I'm just assuming you have a Google account and can set up Google's Cloud console or whatever it is.
Firstly, we are going to create a new project.
1. Select projects tab.
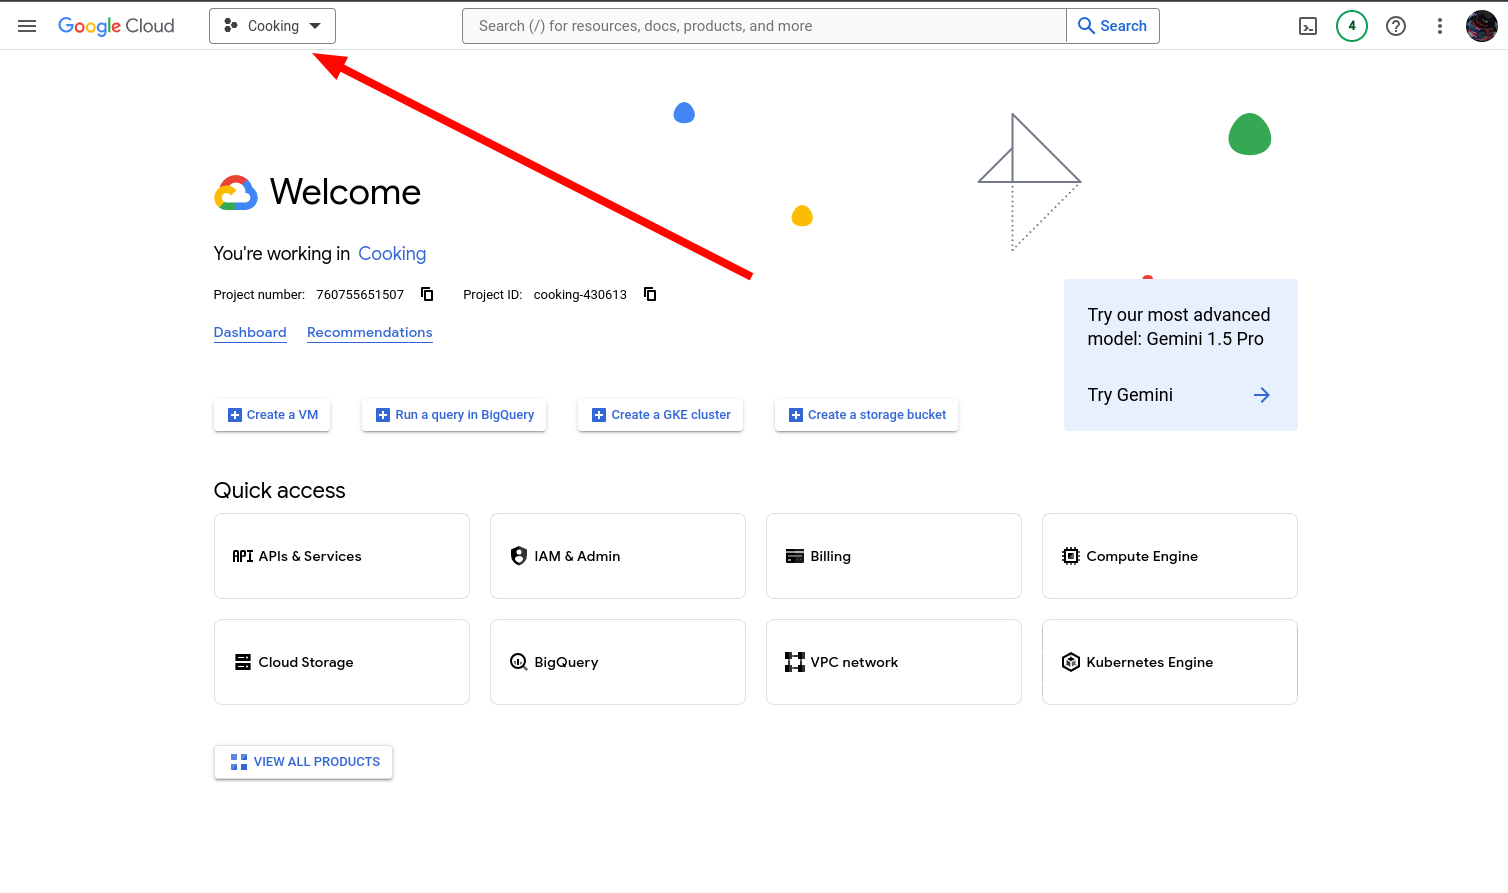
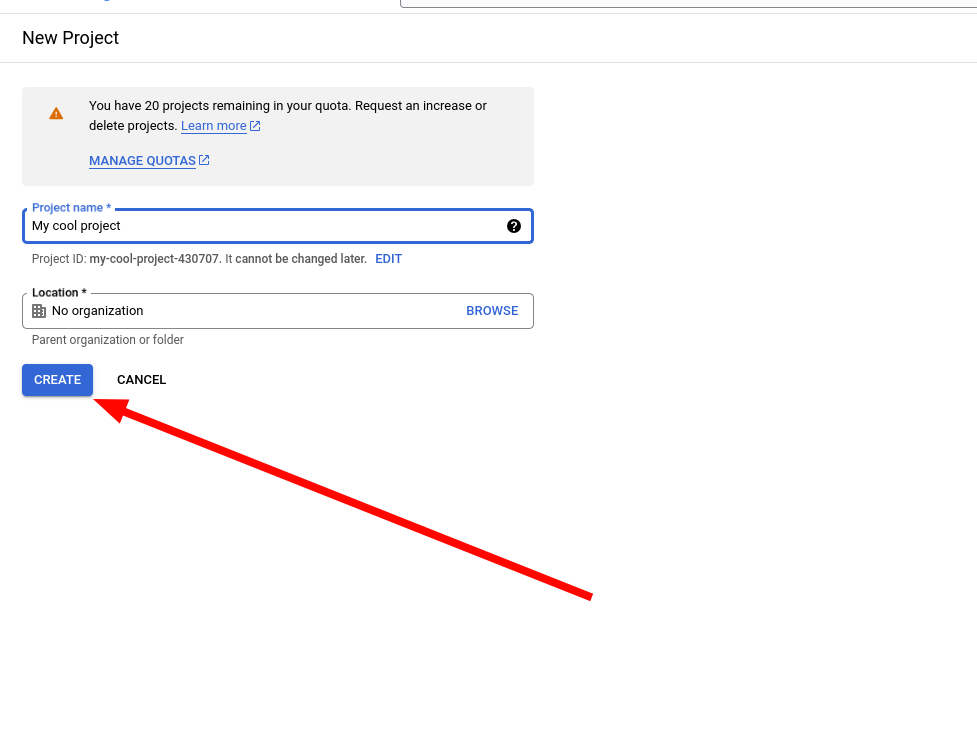
2. Make a new project.
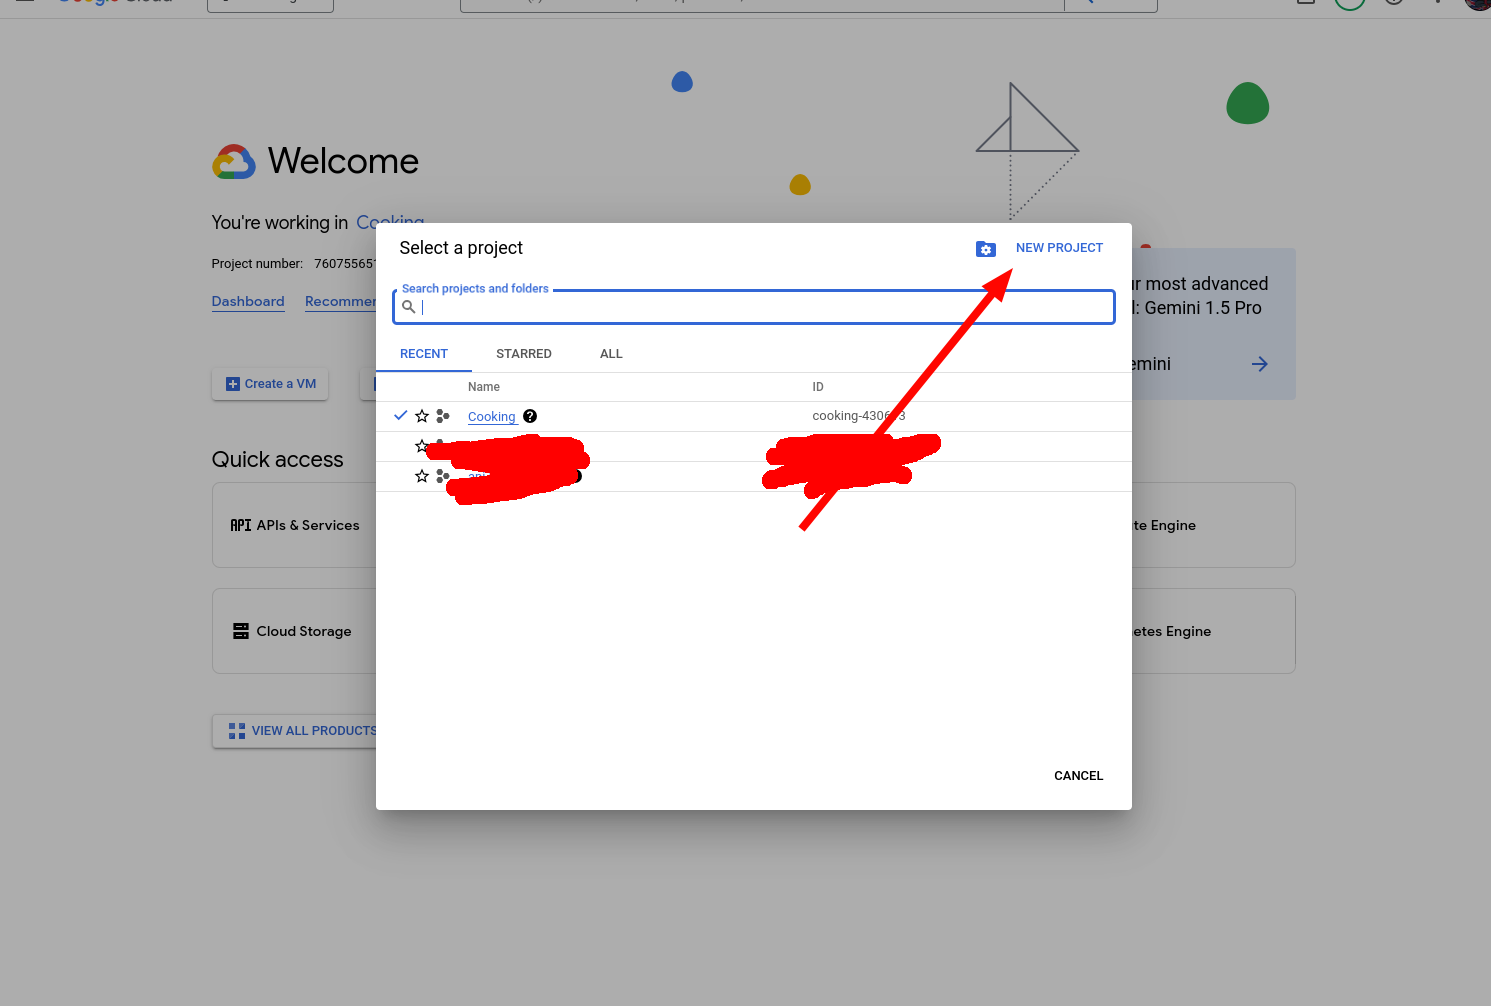
3. Call it whatever you like and create it.

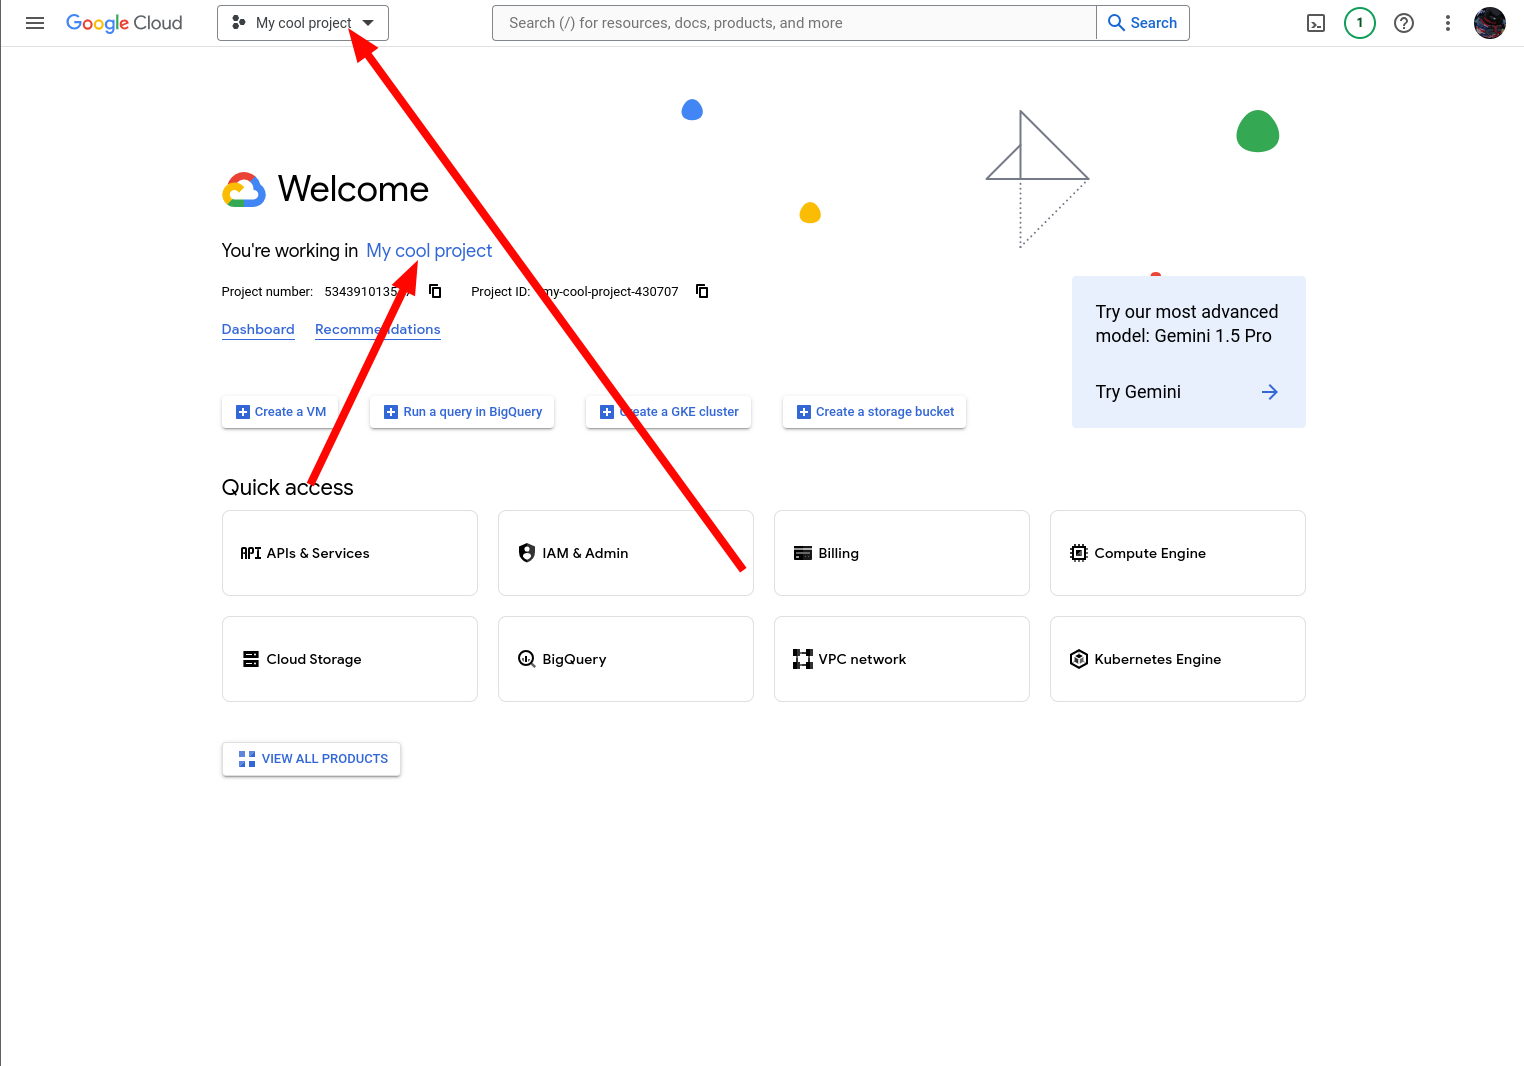
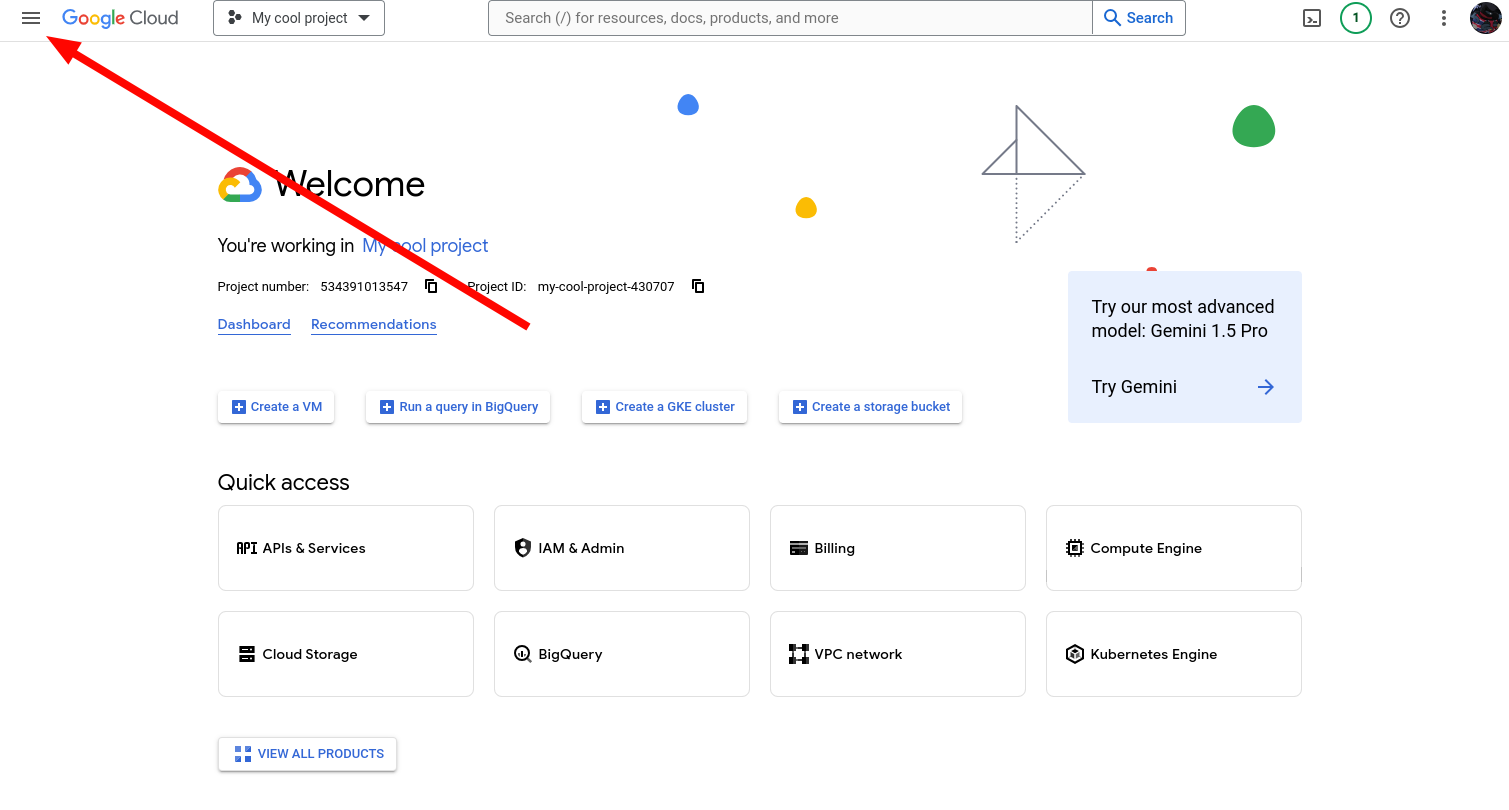
4. Make sure you're now working in this new project.
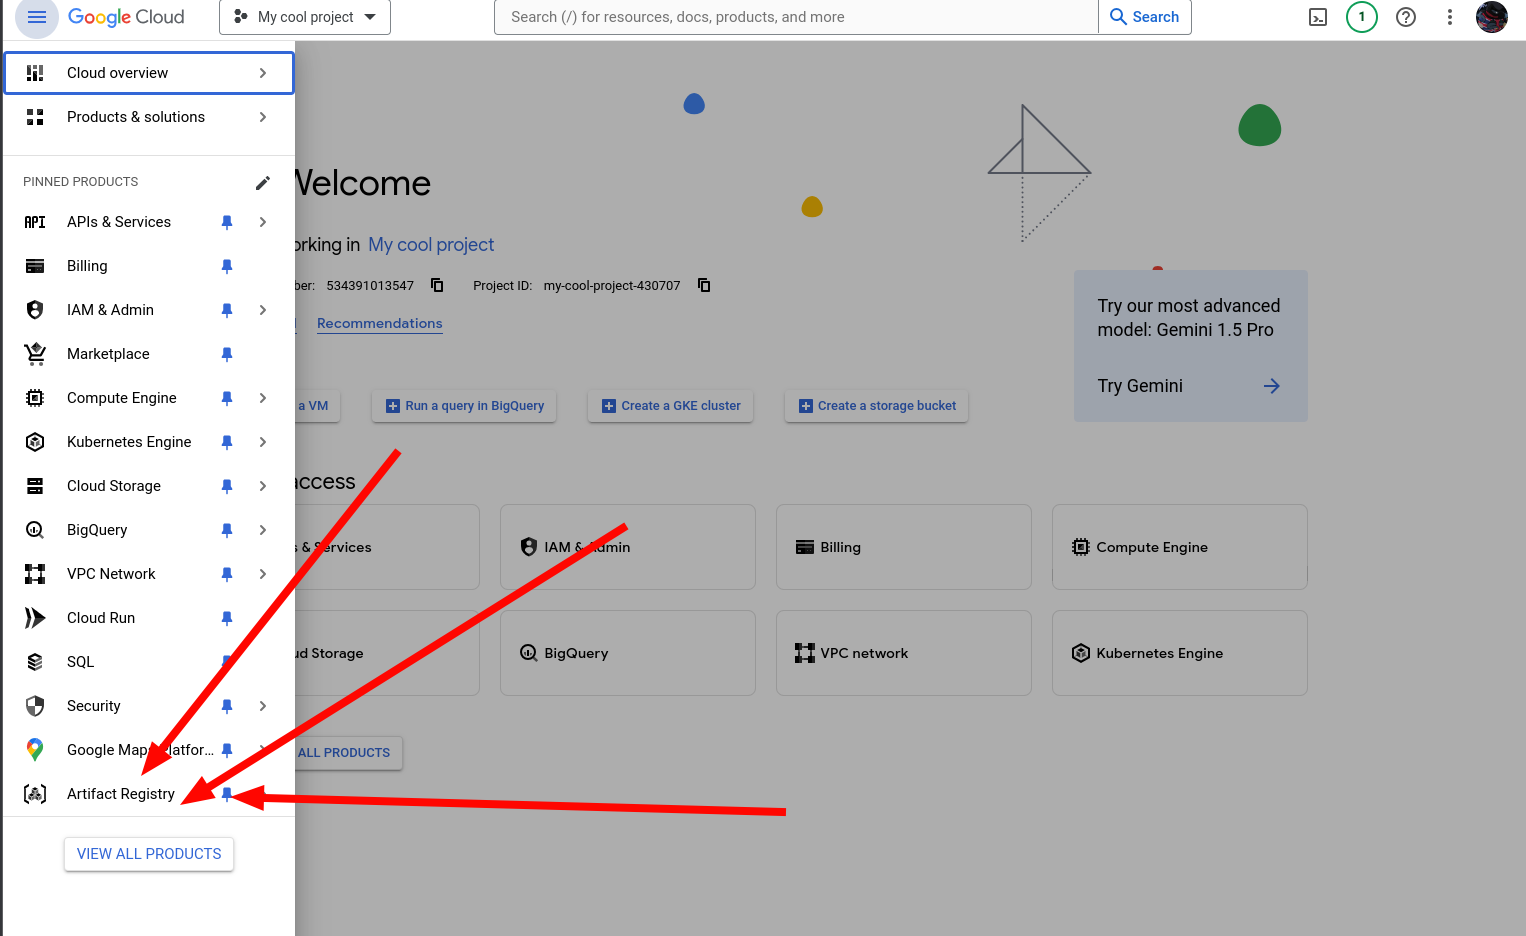
5. Navigate to Google's Artifact Registry.
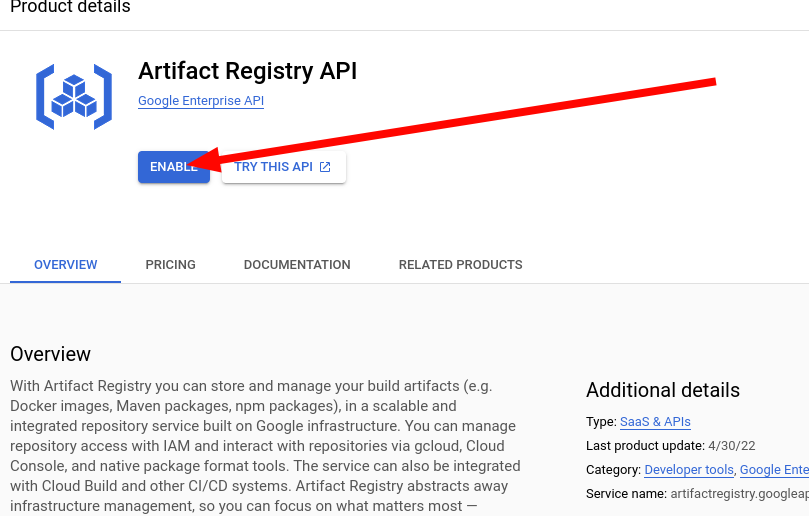
6. Now you need to activate the Artifact Registry API.
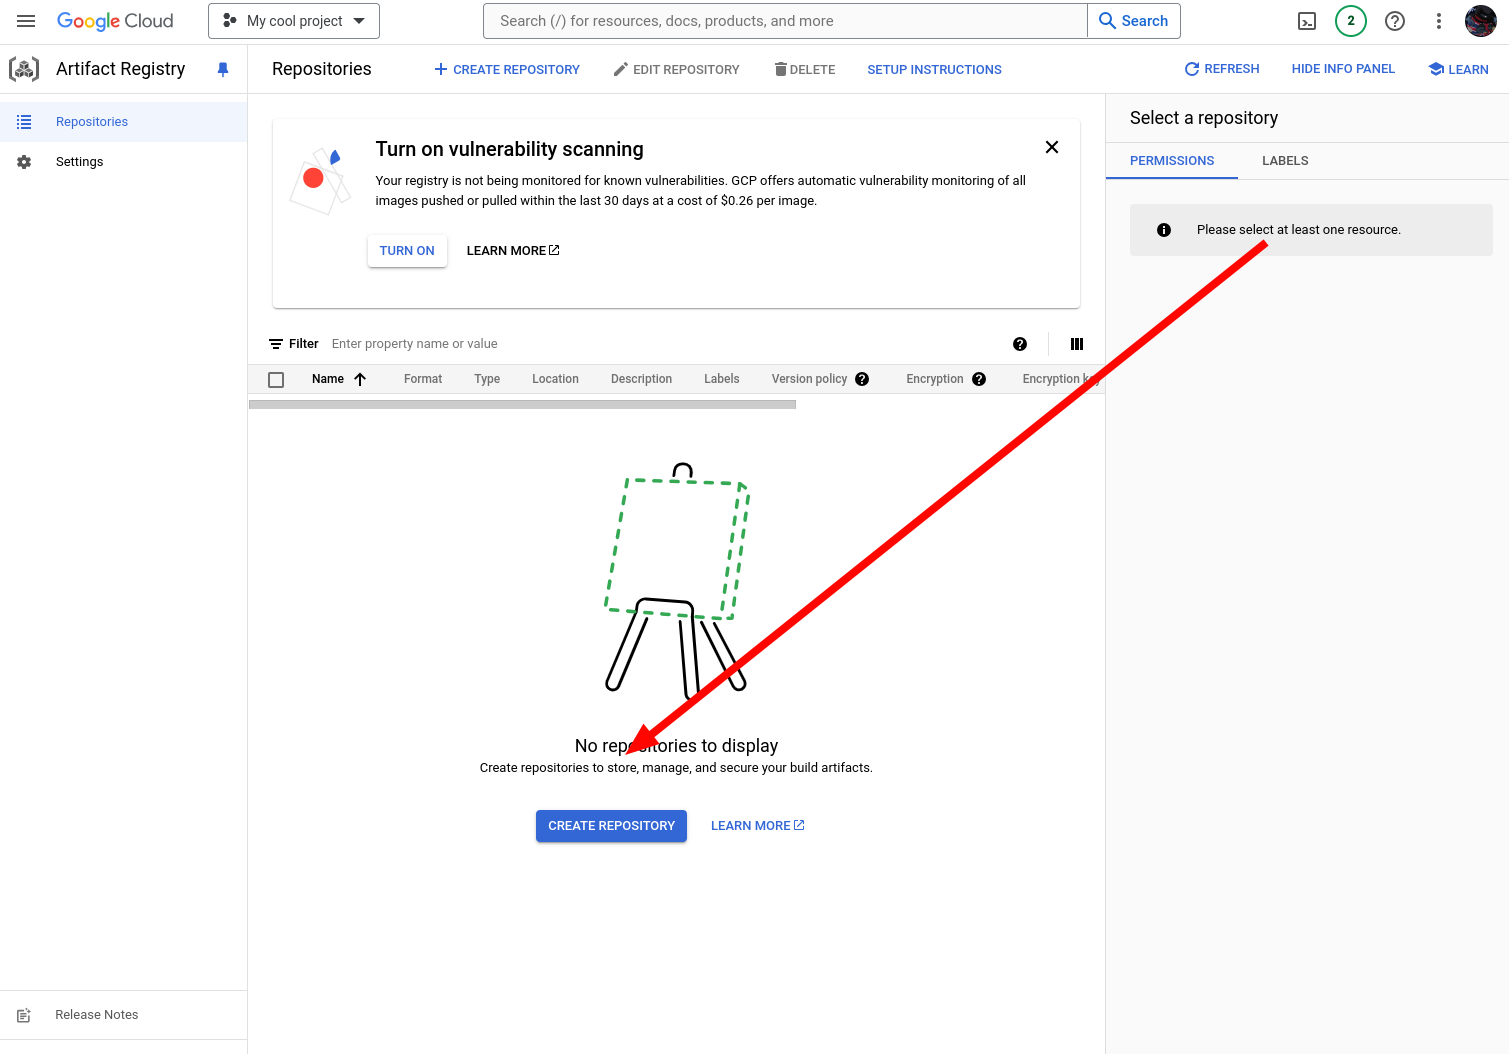
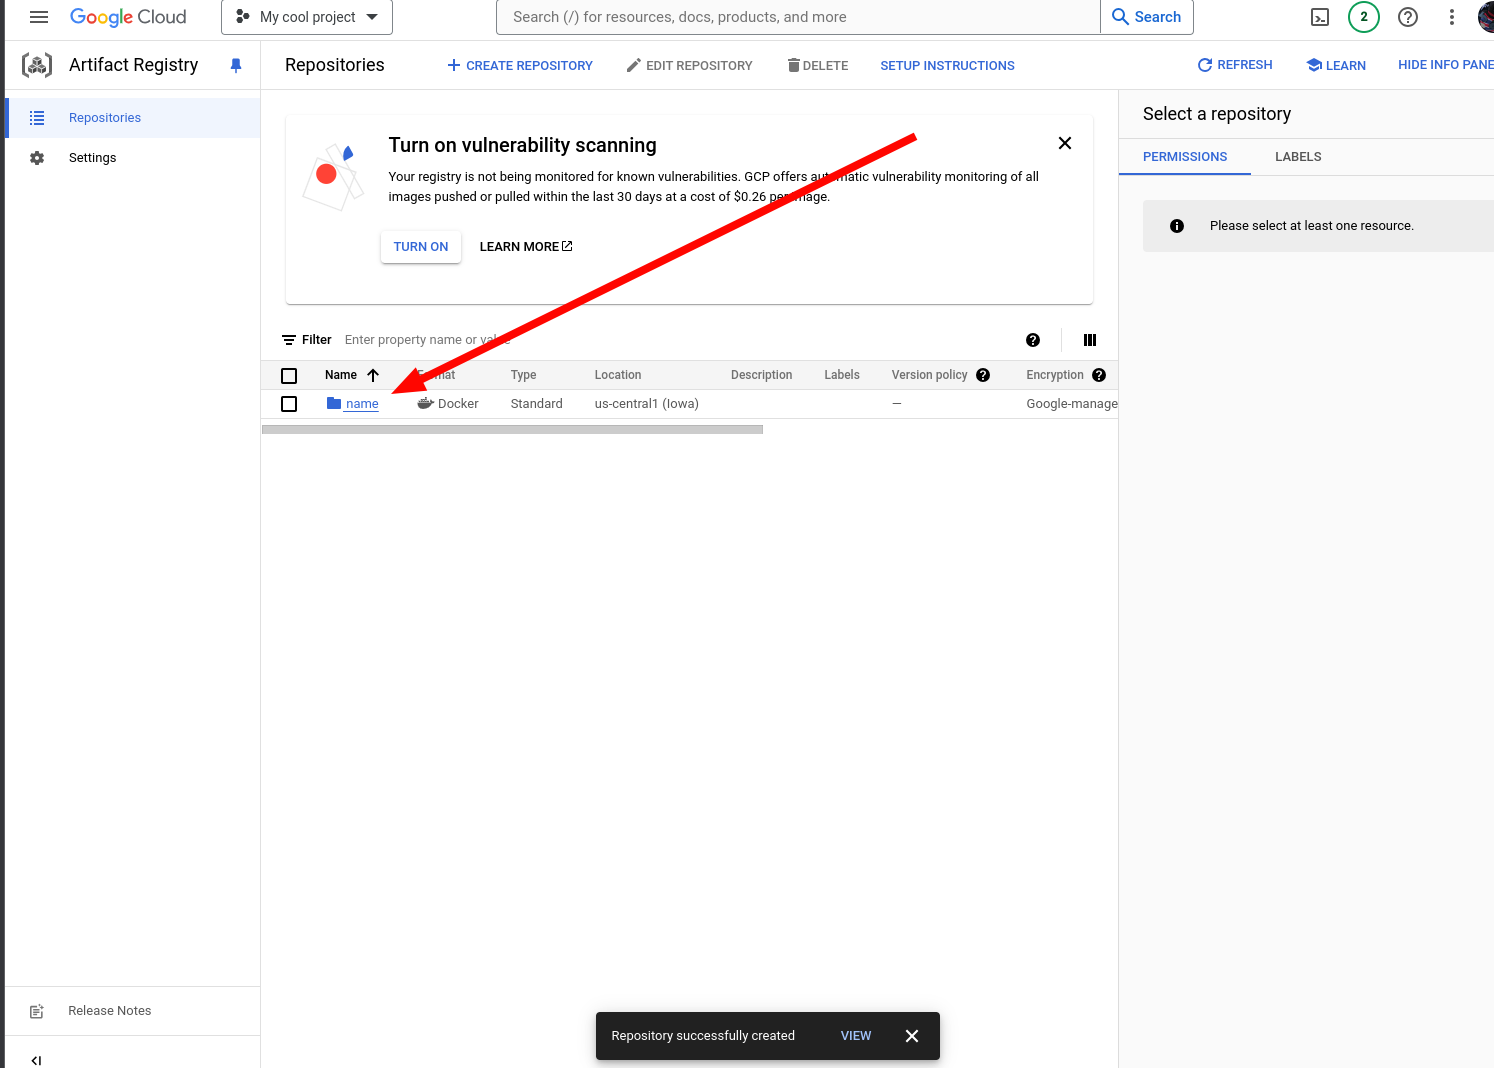
7. Create a repo.
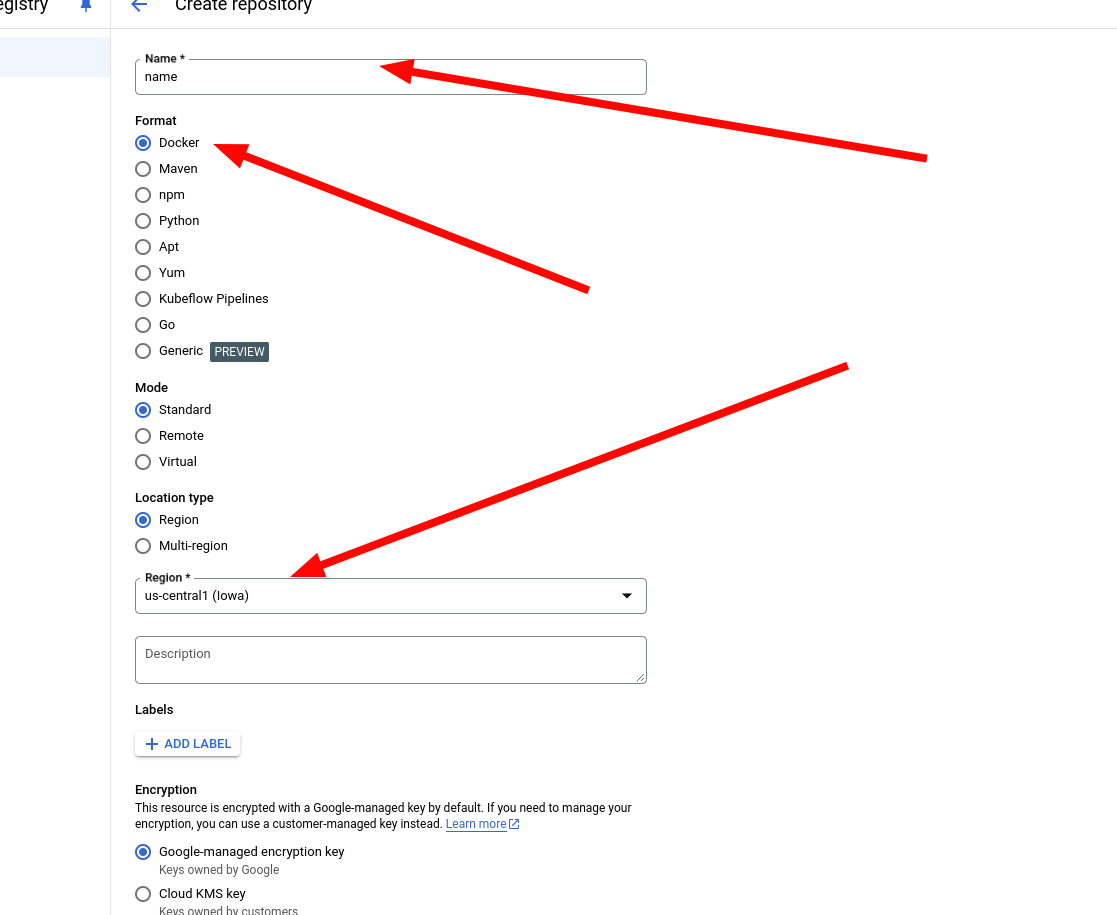
8. Name the repo. Make sure it's using Docker, and change the region. I recommend us-central1, if you're going to use a custom domain. Then, create the repo.
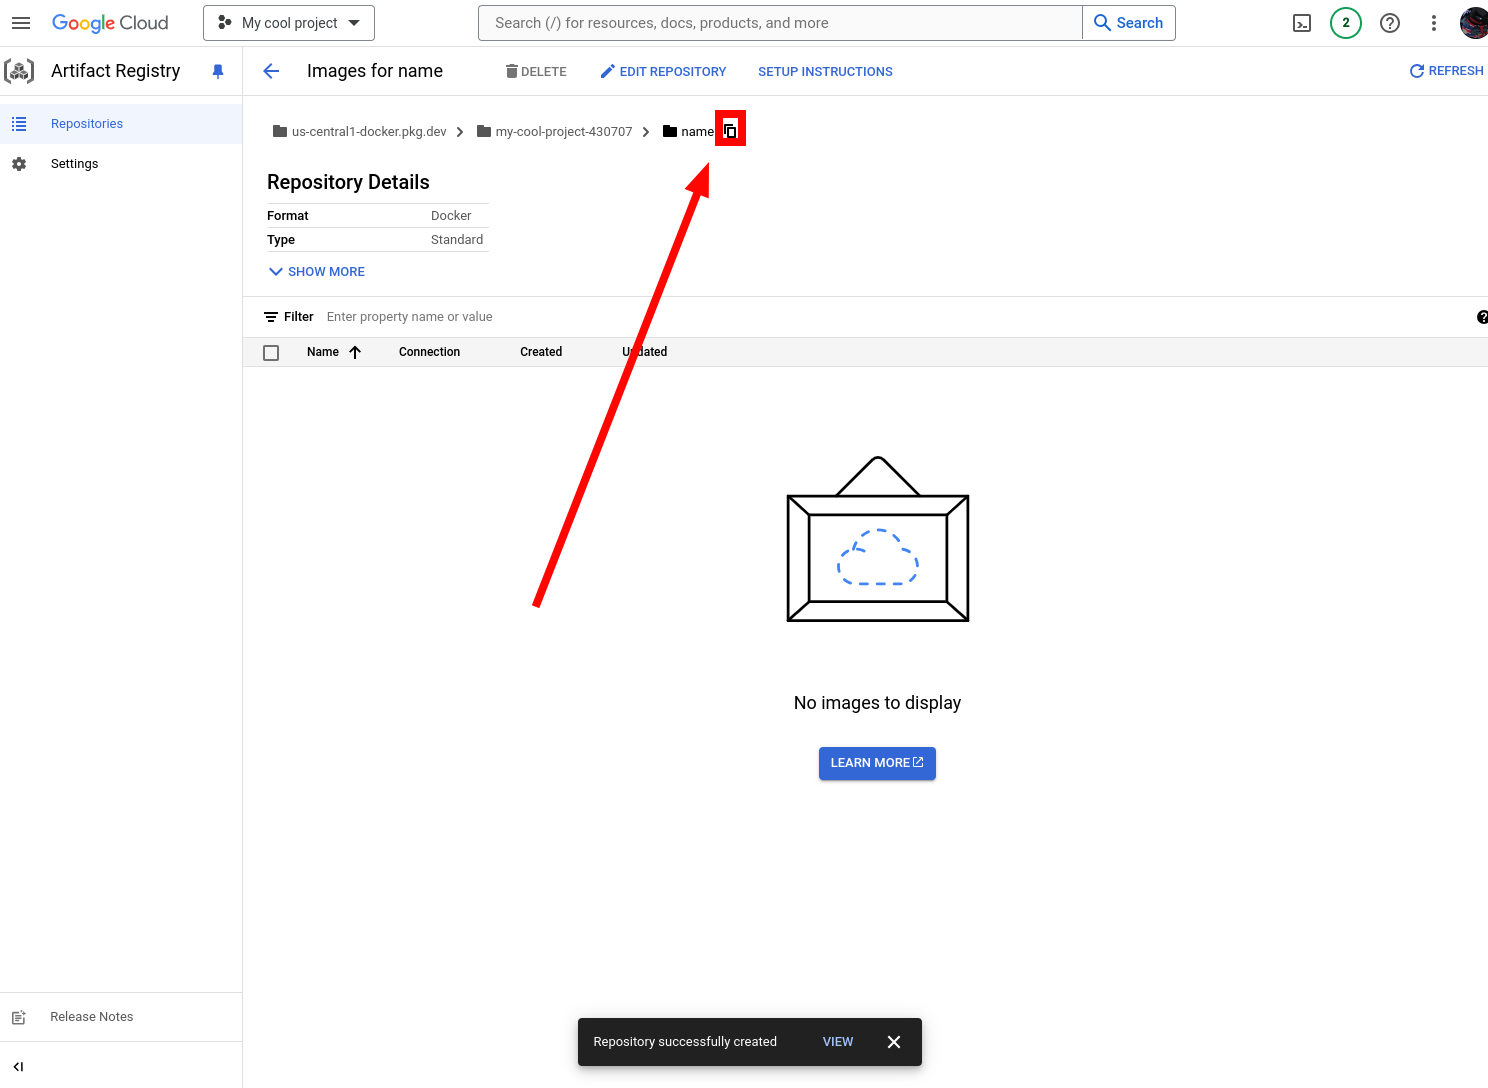
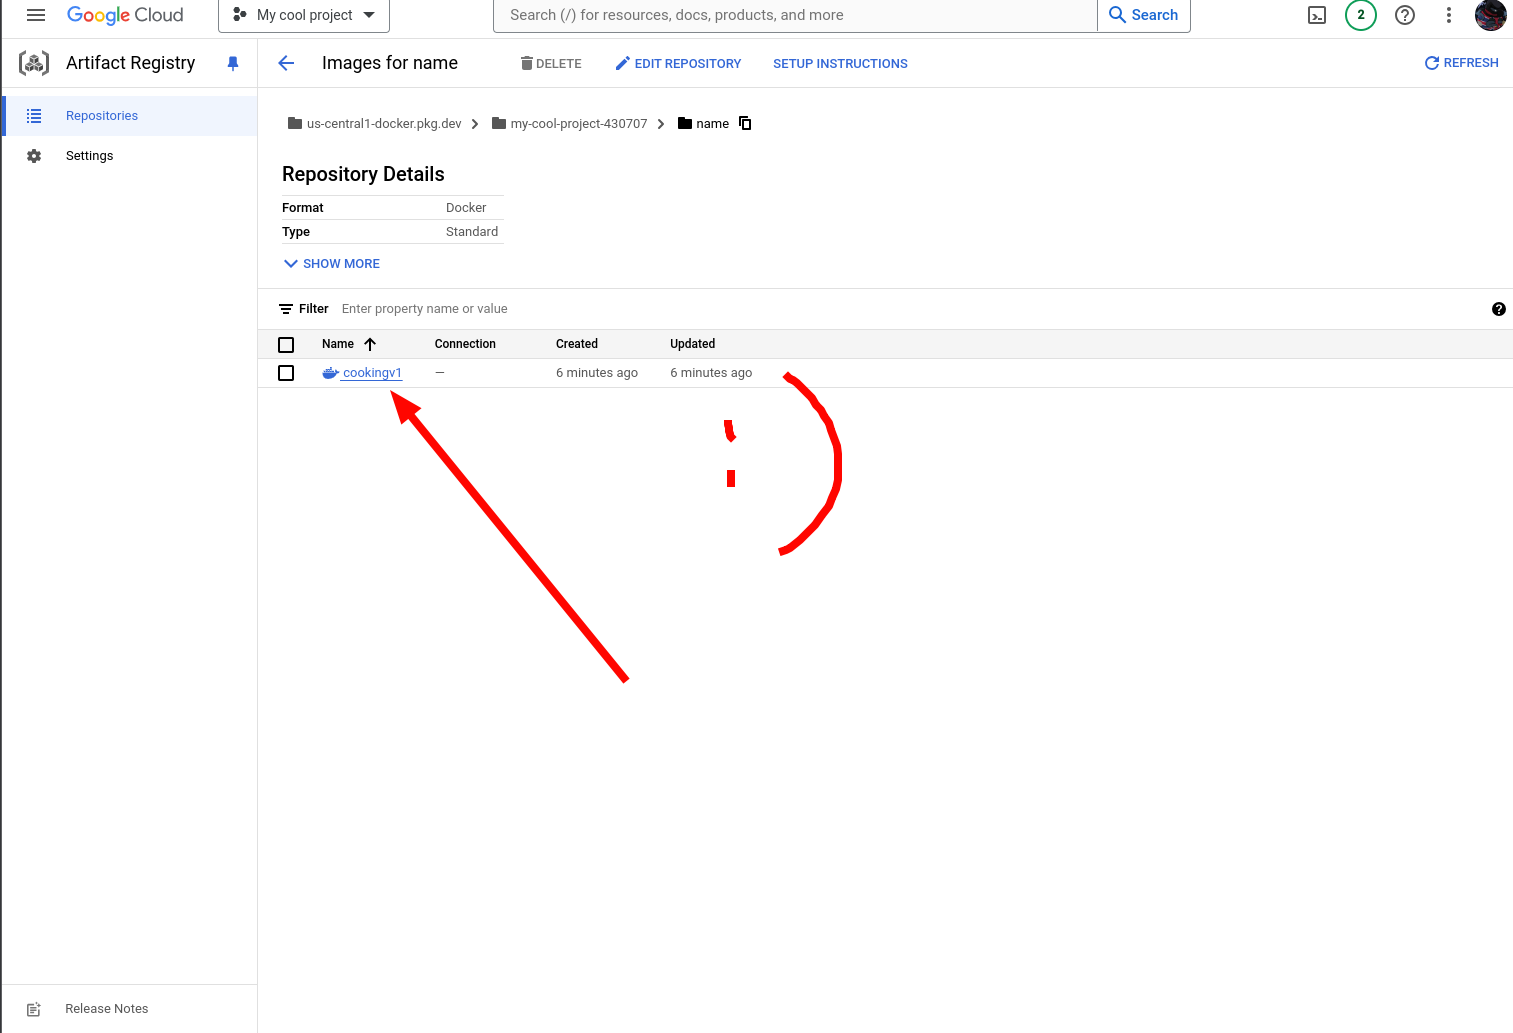
9. Open the repo.
10. Click the copy button to copy the repo link.
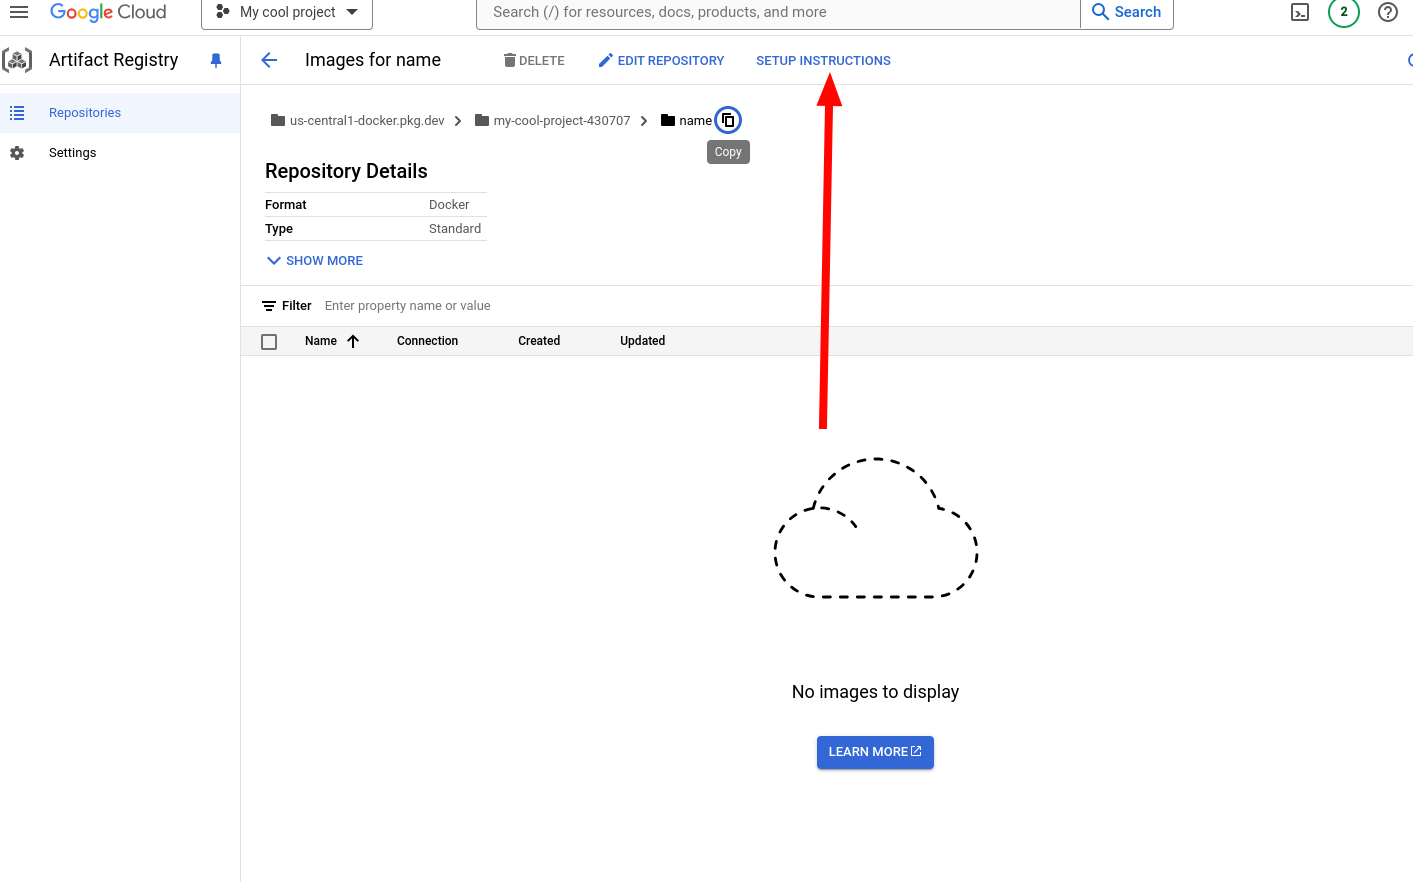
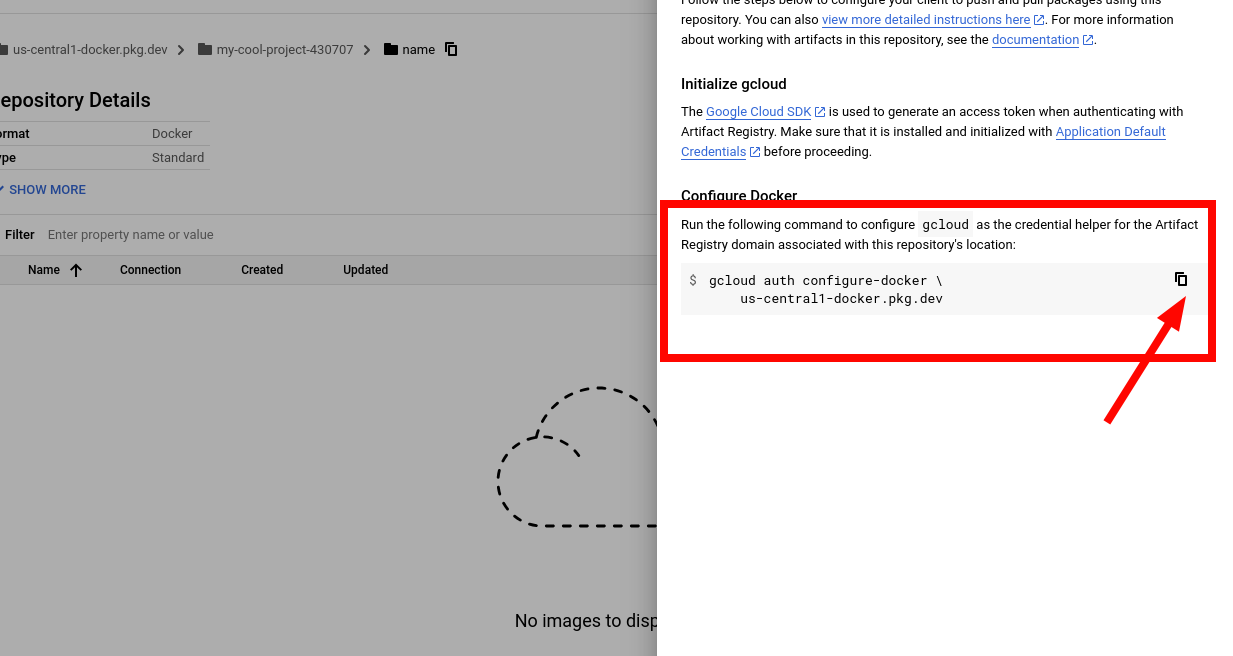
11. Go back to the terminal and run these commands. Be VERY CAREFUL. I forgot to do image name, and ended up wasting an hour trying to figure out where I went wrong. Please authorise first. This assumes you have gcloud CLI installed. Change the region to whatever region your repository is in. You can find these instructions in the setup instructions button on the repo page.


Here's an example of it working:
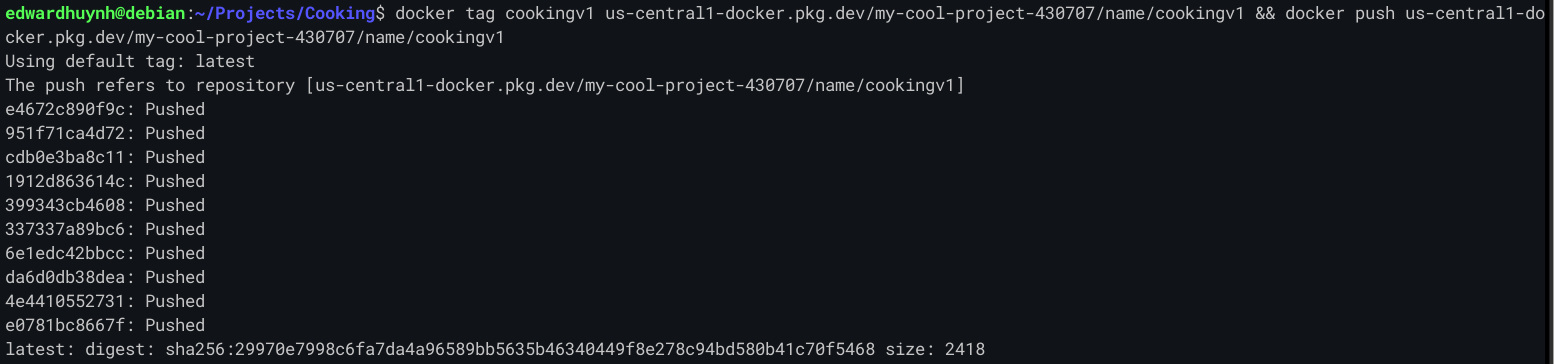
If it all went well, you should now be able to see the image in your project repo.
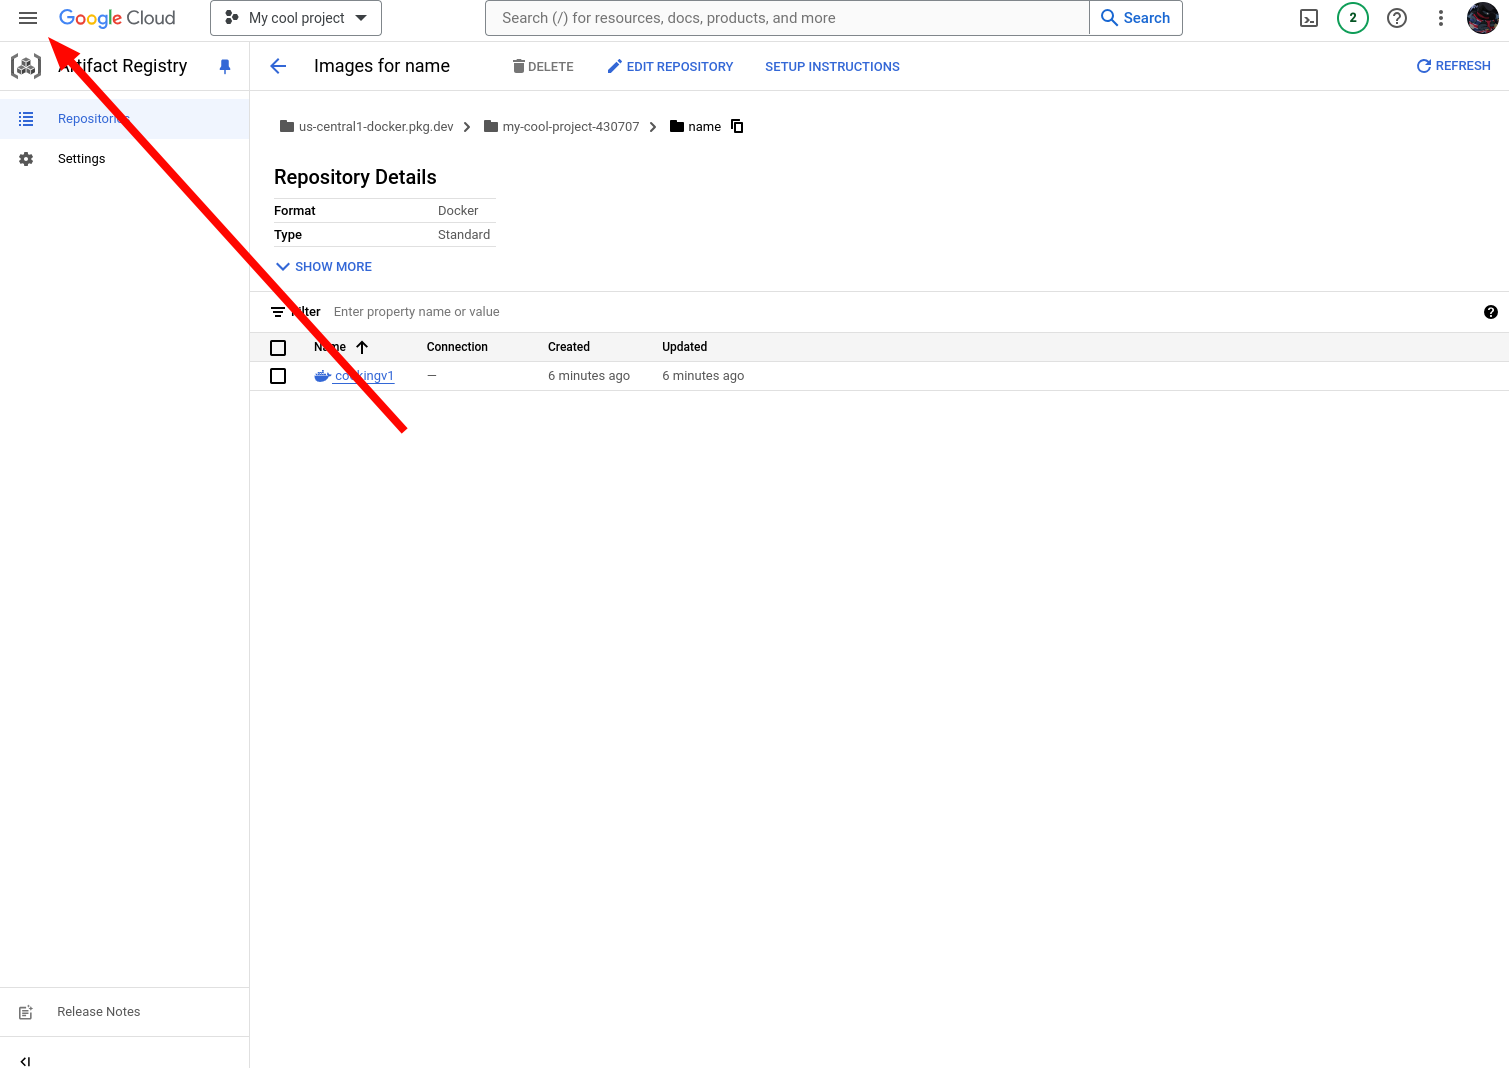
Awesome! We can now pass this along to Cloud Run.
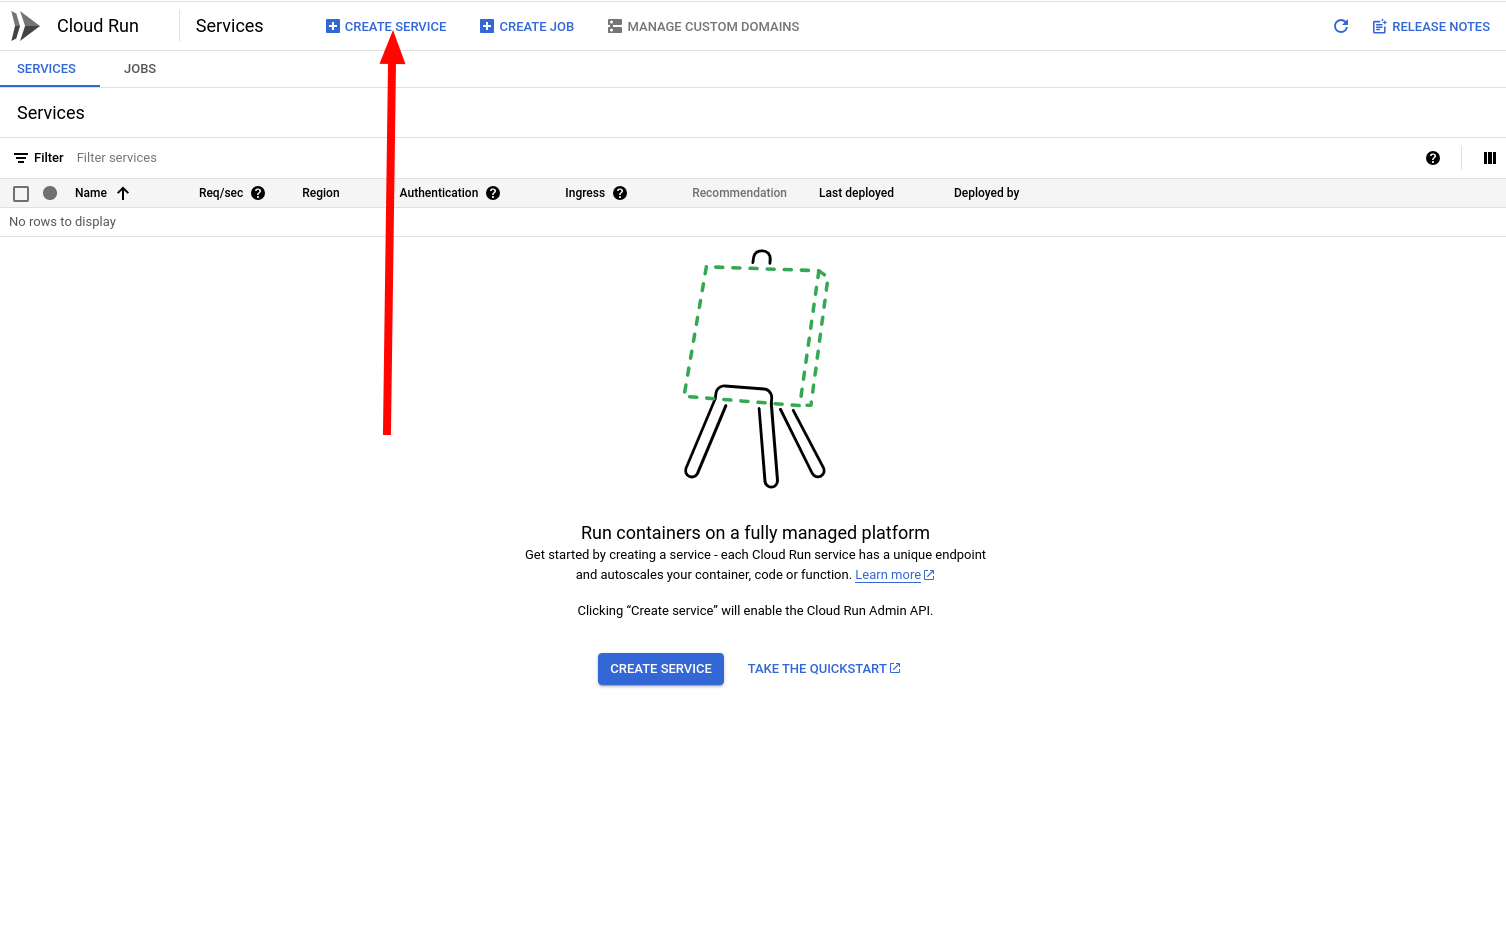
12. Navigate to Cloud Run and create a new service.
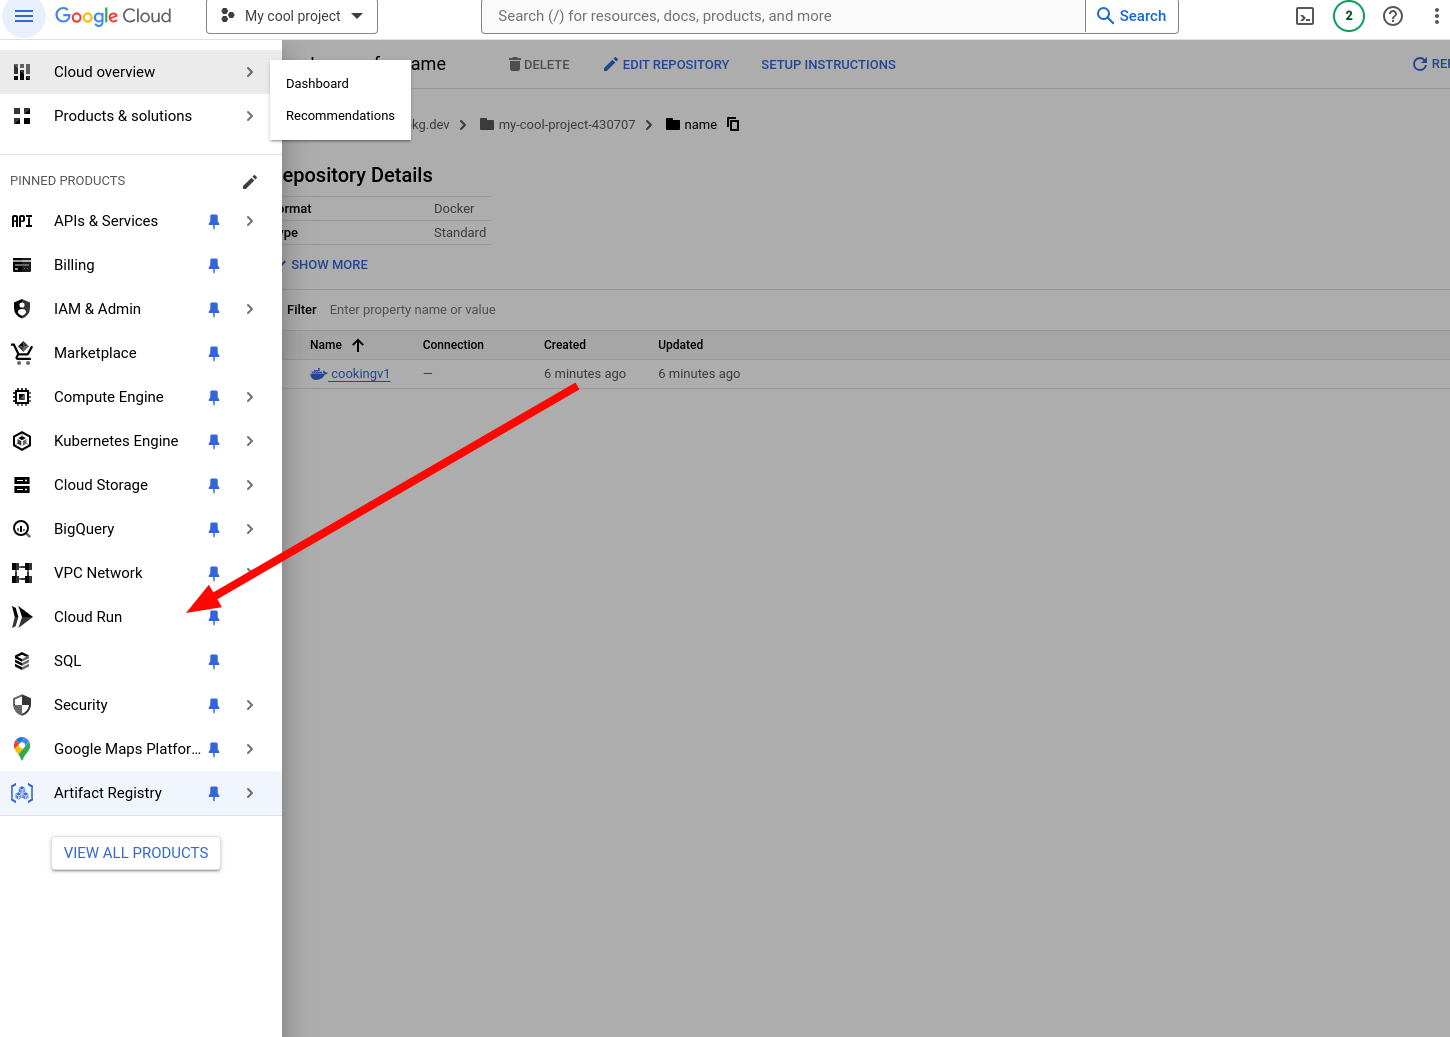
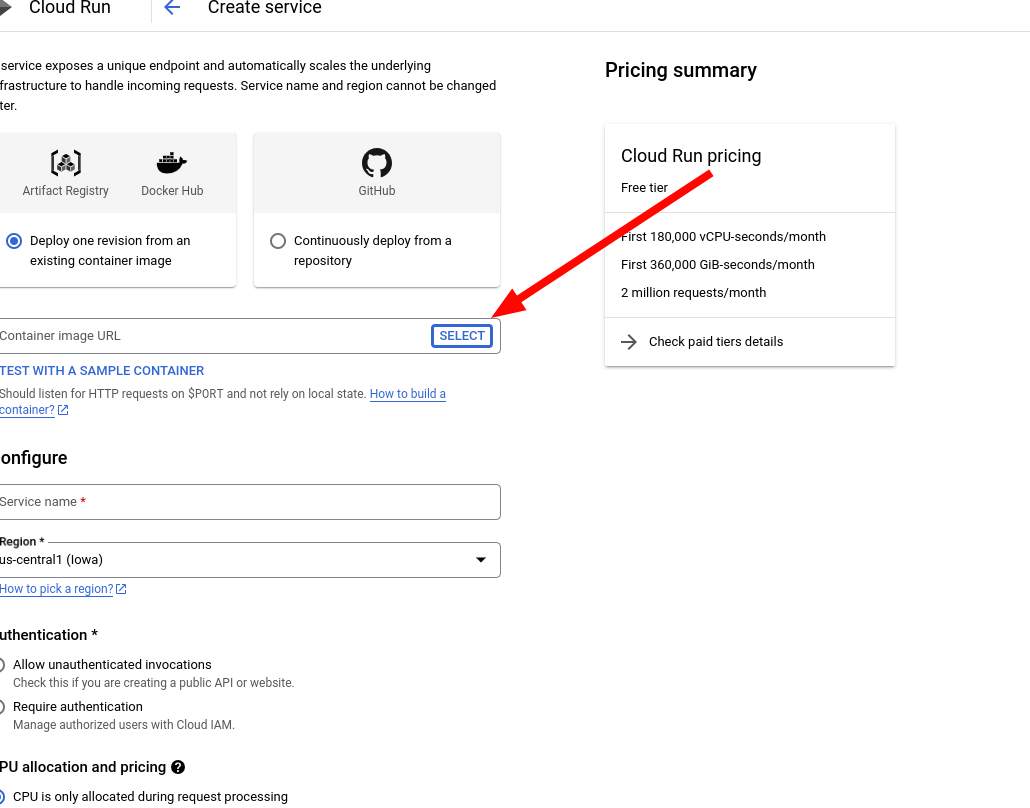
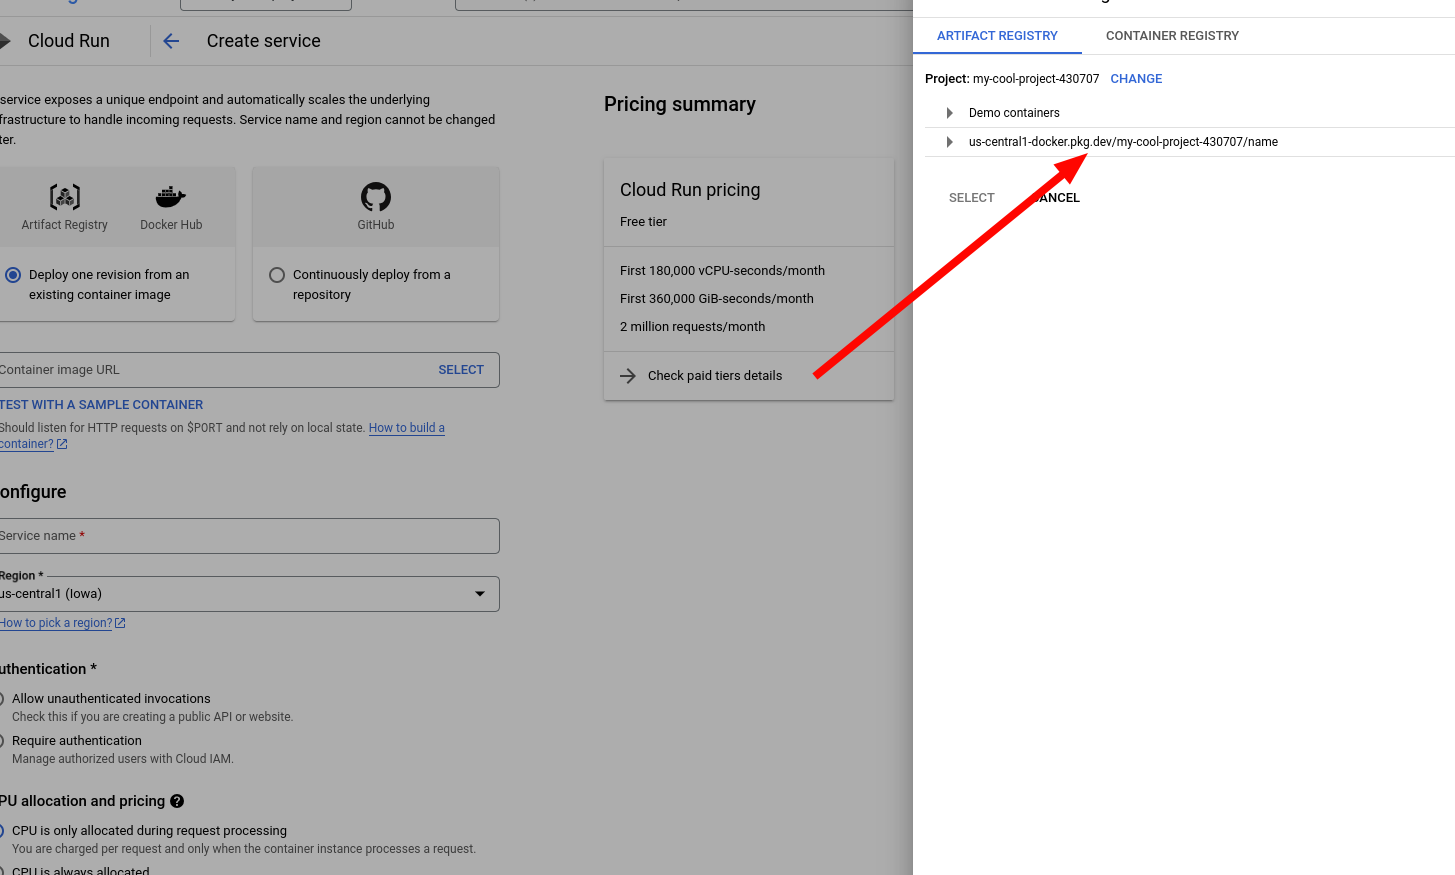
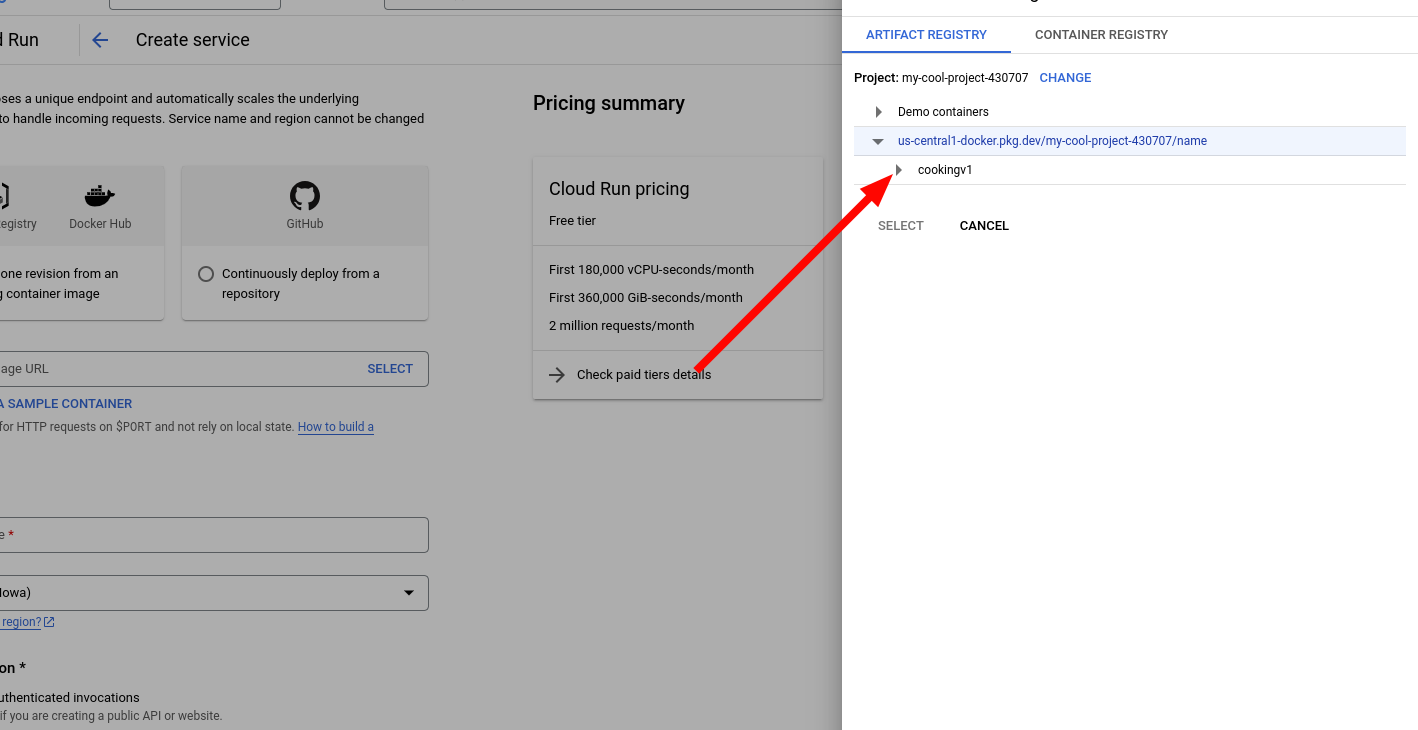
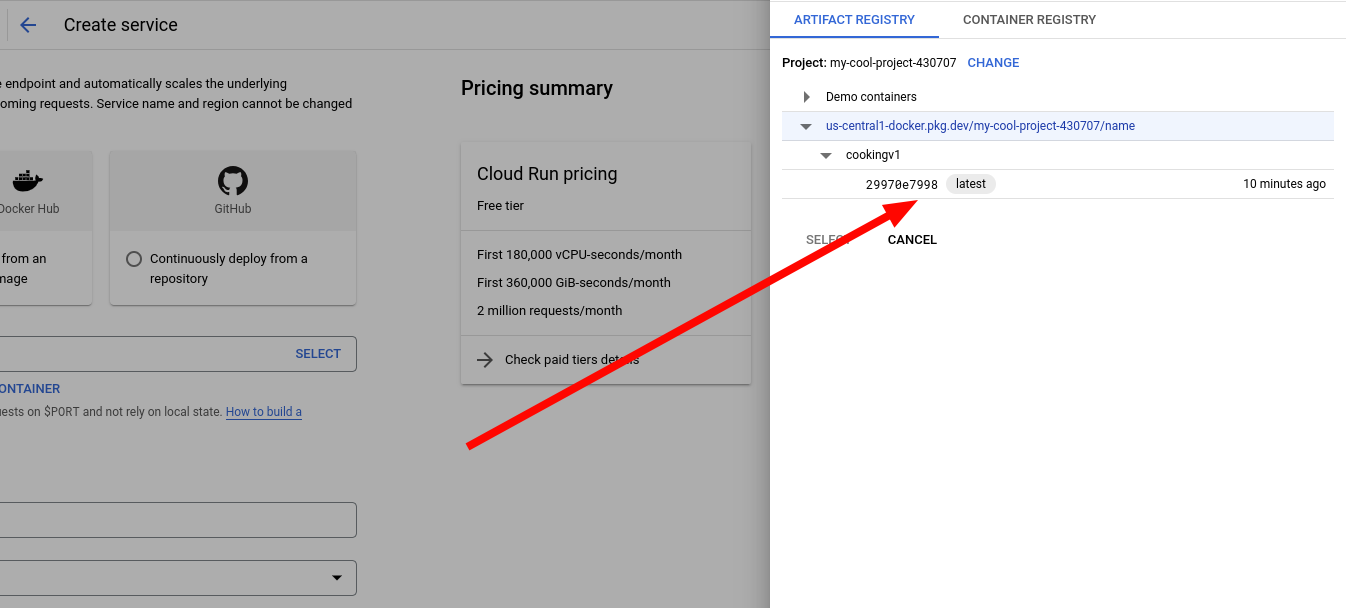
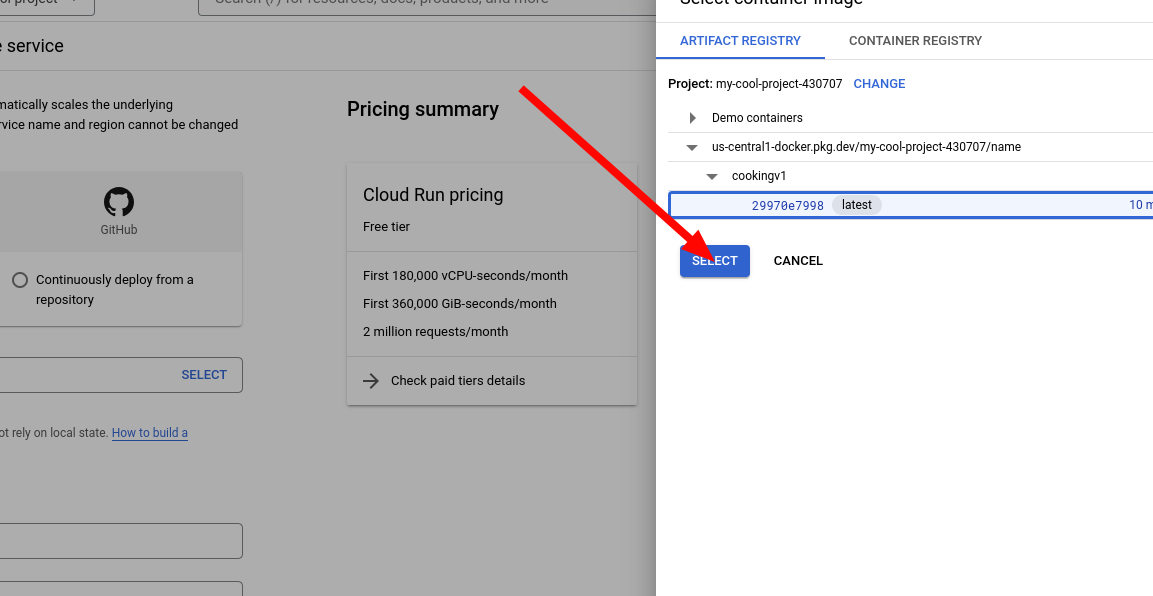
13. Select the image you just made.
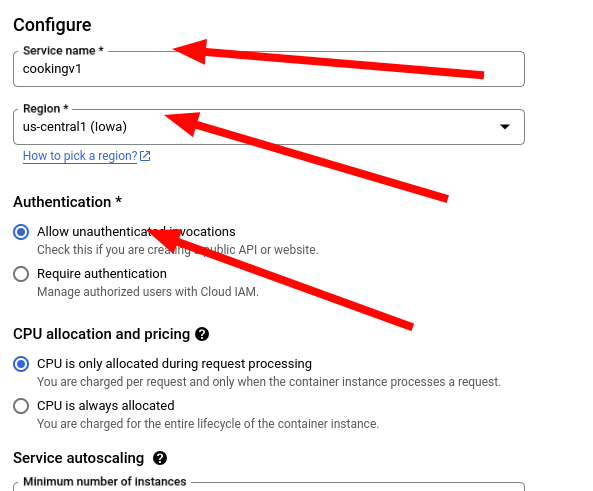
14. Configure the service. Give it a name and a region, I recommend the same region as the image. Also, under authentication, select Allow unauthenticated invocations. This allows anyone to access it.
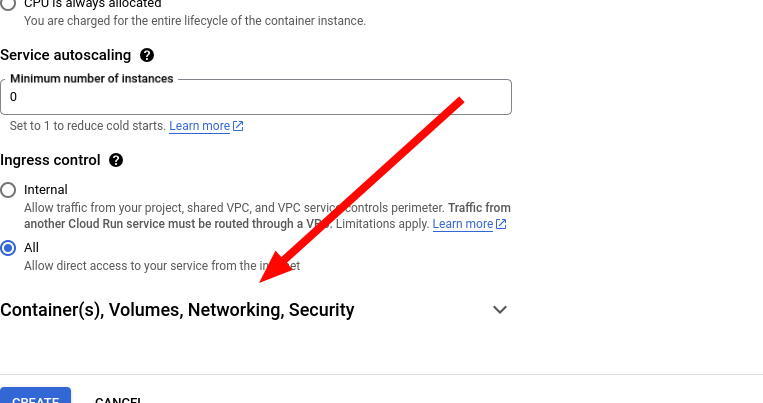
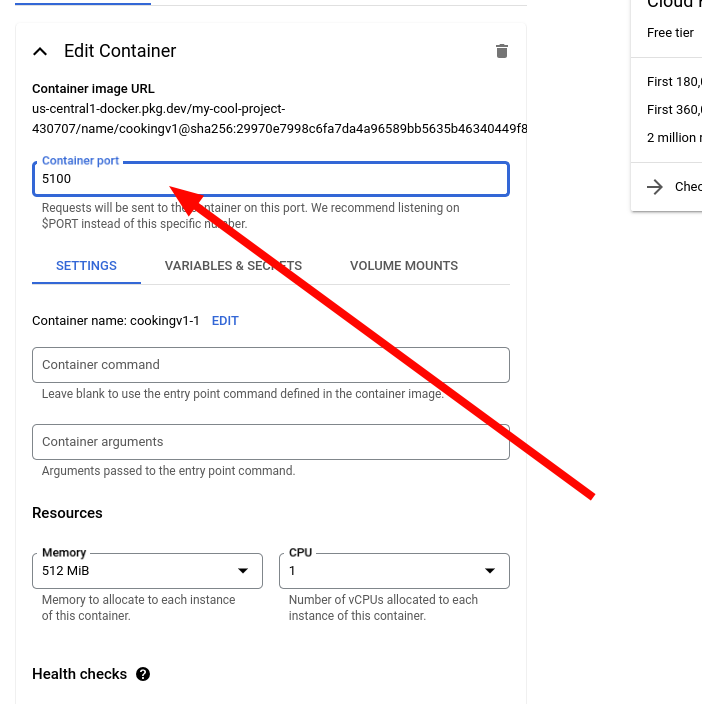
15. Open the Container settings.
16. Change the port if necessary. In my Dockerfile, I exposed port 5100 so I'll change it to that.
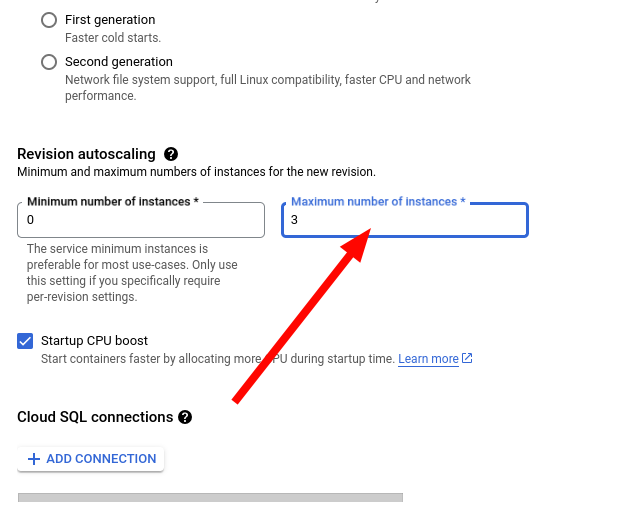
17. I recommend changing the maximum number of instances to something low, so that you don't wake up to a million dollar bill from Google.
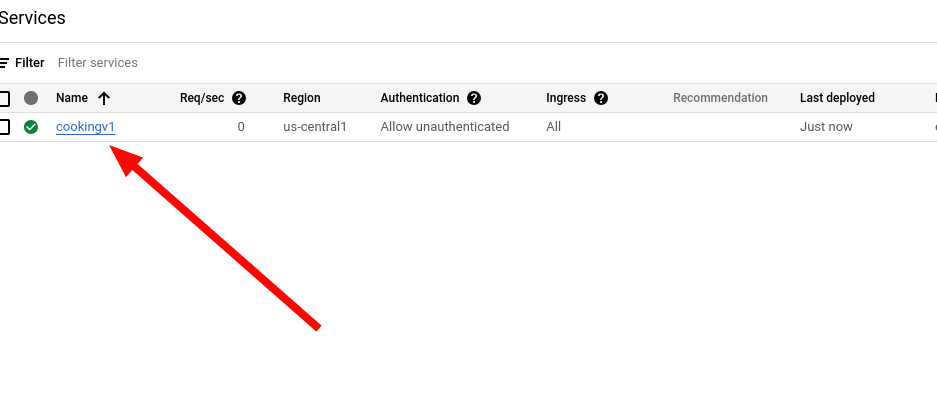
18. Create! If you let it cook for a bit, you should see your website has been successfully created.
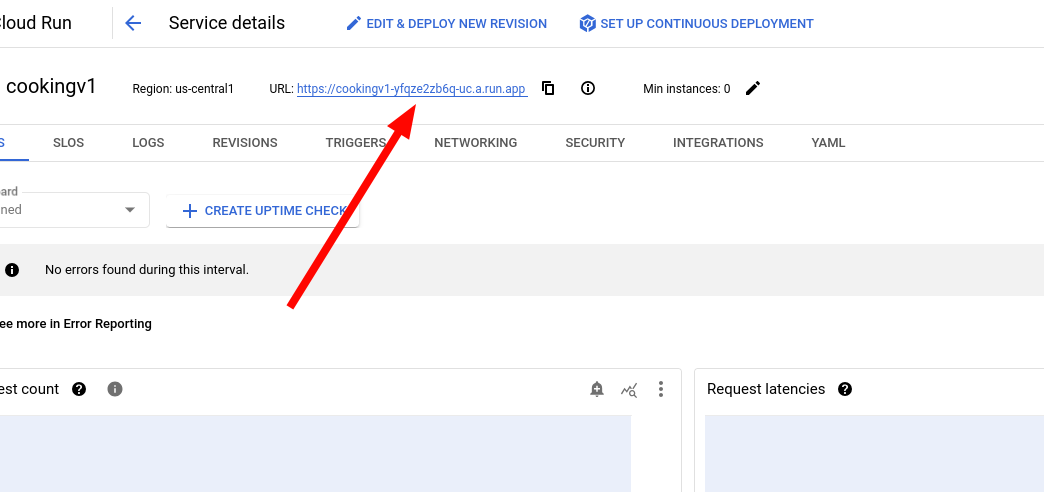

Congratulations! If you followed these steps correctly, you should have a Flask application running via Google's Cloud Run. Using Cloud Run is convenient because they are very generous with their free tier, and they have an option for it not to be running when no one is using it. This will, however, mean that every time you use it, it takes a while to boot up, but a small price to pay for free-ness. I won't make instructions on what to do next, because its kinda trivial. You can go to Manage Custom Domains to add the service you created to a domain you own. If you've set up your code in a Github repository, you can also use Continuous Deployment (CD) so you don't have to push a Docker image every time you update something.
So those are the details on how this works. Funnily enough, making this page took longer than it did to actually code the fundamentals. But Google, in its mysterious ways, prevents me from finishing anything in any timely manner. If you have any questions, feel free to email me at ed@toomwn.xyz. Goodbye for now! Bento 🥰
[1] You probably could figure out a way to do it with vanilla JS. But I was already thinking of using Python to do it since pdfbook2 uses Python and I had a sneaky suspicion I could just ctrl c ctrl v their code. Which I ended up doing anyways!
[2] I don't think it's worth considering having the user input their own arguments. The point of this is that it quickly makes a PDF into a printable booklet, end of story. Also it's more work for me :(
[3] This may not be necessary but I can't be bothered to remove it.